All Categories
Featured
Table of Contents
- – Rv Sofa Sleeper Rowland Heights, CA
- – OCRV Center
- – Remodeling Rv Rowland Heights, CA
- – Rv Carpet Installation Rowland Heights, CA
- – Rv Sofa Beds Rowland Heights, CA
- – Rv Dining Table Rowland Heights, CA
- – Rv Microwave Replacement Rowland Heights, CA
- – Awnings For Rv Rowland Heights, CA
- – Awnings For Trailers Rowland Heights, CA
- – Rv Dinette Booth Rowland Heights, CA
- – Rv Microwave Replacement Rowland Heights, CA
- – Rv Restoration Companies Rowland Heights, CA
- – Rv Interior Remodel Rowland Heights, CA
- – OCRV Center
Rv Sofa Sleeper Rowland Heights, CA
Whether you're wanting to add more storage, produce a comfy space, or just upgrade the appearance, a dining room remodelling can considerably boost your RV living experience. Before we dive into the "after" images of recreational vehicle dining room conversions, you may be wondering precisely just how to eliminate a RV dining cubicle. Well, it transforms out it's fairly easy: you seek screws and remove them.
We have an thorough guide detailing the complete dinette cubicle elimination process, however we'll provide you the general concept right here. Below is a picture of a motor home eating cubicle being removed. You can see exactly how it's simply a wooden framework screwed to the wall and floor. You'll most likely additionally require to fill some openings in your wall, which you can do with some spackling.
Things do not shift around while your RV is in motion. If just two individuals ever before rest at your dining table, you can save area in your Recreational vehicle by replacing the 4-person dining room with a table for two, which is a great choice for developing more area.
Remodeling Rv Rowland Heights, CA
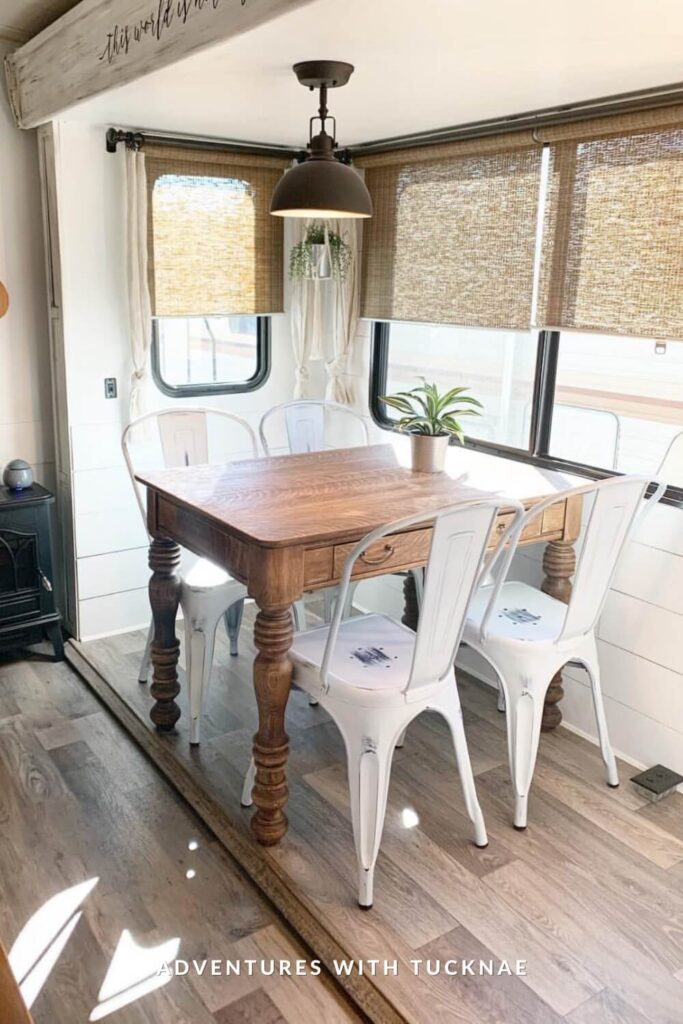
The brand-new table was covered with a dampness and scratch-resistant veneer to make sure resilience and longevity. Photo Credit Score: Terri Voight Closs He used museum putty to safeguard attractive items on shelves and wall surfaces to make sure that traveling requires loading away only a few things and securing the furniture. When it comes to selecting a dinette table for your recreational vehicle, the alternatives are as diverse as the Recreational vehicles themselves.
Traditional wood tables supply a warm, cozy feeling, excellent for creating a pleasant ambience in your dining room area. On the various other hand, modern-day glass tables can give your RV a sleek, contemporary appearance, making the room really feel even more open and ventilated. For those seeking toughness, steel tables are a durable alternative that can withstand the rigors of recreational vehicle travel.
Rv Carpet Installation Rowland Heights, CA
Wall-mounted tables are one more fantastic option, especially for Motor homes with restricted space, as they can be folded up down when not in use. Fold-down tables use adaptability, allowing you to produce additional space as required.
This opens up the flooring space and can still seat a couple or tiny household. Photo Credit Scores: Suzanne Taylor Plus, these tables might quickly double as a workdesk for a home office.
Rv Sofa Beds Rowland Heights, CA
This not only enhances the convenience yet additionally makes best use of the living area in the RV. This RVer ordered these comfy chairs off Amazon. Trendy Workdesk Chair No Wheels: A stylish mix of convenience and style, the removal of armrests and castors gets rid of all unneeded design, easily matching any type of dcor to develop an impact of comfort and elegance, the distinct black lacquered cross aluminium base with non-slip all-natural rubber feet connected to each support leg to avoid scratching and slipping, perfect for offices, bedrooms, research studies, living areas, dressing tables, parlours and dorm areas.
With the ideal spacing, this is an excellent means to keep your storage alternatives and still have an area to consume. Image Credit Report: Suzanne Taylor Half the work with major advantages!
Rv Dining Table Rowland Heights, CA
Completely transform an area by turning the cubicle sideways. Utilize one bench flush against the wall surface and add a table and chairs. Picture Debt: Vieves motor home Remodels Or relocate your booth to the back of your trailer or 5th wheel, like in this style: Picture Credit report: Inheritance Homes LLC This may need restoring a bench seat to fit the best measurements of your room.
Open up your RV by eliminating the rear of your eating cubicle however maintaining the bench seats! Take into consideration including motor home dining room cushion covers to safeguard the remaining bench seats and improve the visual allure. After eliminating the booth entirely, this household still desired bench-style seats, which is a great choice for any travel trailer.
Rv Microwave Replacement Rowland Heights, CA
Image Credit Report: Including a piece of counter top to a cooking area can develop a new eating room, permitting the dining cubicle in this motor home to be eliminated and the space to be utilized for various other furnishings. Consider updating the floor covering to enhance the new bar location and boost the general visual of your recreational vehicle.
by David Barber by means of After removing the dining booth from their motorhome, recreational vehicle proprietors Eric and Katie built this amazing combination home entertainment facility, eating table, workdesk, and fireplace, showcasing the adaptability of recreational vehicle's and improving the general look of motor home interiors. You can review just how they removed their dining cubicle and made it on their blog site.
To make the eating room highly adaptable, those chairs are patio furniture that can easily be relocated onto the back deck. The table swivels out and a leg is included for assistance. You can visit this motor home in full here. Photo Credit scores: bbandtherv As component of the process of turning her motor home right into a little home, this motor home proprietor eliminated her eating cubicle and changed it with a baker's rack to make use of as a coffee terminal.
Picture debt: Creating a functional space in your RV dinette location starts with taking into consideration the tasks you take pleasure in most. If you love food preparation and enjoyable, prioritize a huge dining table and ample storage space for your kitchen area fundamentals. On the various other hand, if relaxation and reading are more your design, a relaxing dinette cubicle or a comfortable seating location may be the best fit.
Awnings For Rv Rowland Heights, CA
Take into consideration replacing your old dining room paddings with new ones or including vibrant chairs to develop an extra lively and inviting atmosphere. In addition, you can change the space right into a morning meal space or a little office location, depending on your needs and preferences. By making the many of your eating location, you can develop a practical and comfortable area that enhances your motor home life, making it a delight to hang around in your house on wheels.
You can make use of a tiny table and chairs or even a dining room cubicle with a built-in table. Think about incorporating storage below the table or bench to maintain mess at bay and make best use of area.

Creating a useful dining room needs mindful factor to consider of your needs and choices. Believe concerning the types of activities you perform in the dinette location, the number of people that will be utilizing the room, and the quantity of storage space and counter area you need. Take into consideration the design and visual you intend to attain, whether it's modern-day, traditional, or rustic.
Awnings For Trailers Rowland Heights, CA
Exact measurements are important to make certain the table fits perfectly and permits comfy activity around the dinette location. Next, take into consideration the kind of flooring and wall surface building in your RV, as this will affect the installation procedure. For example, if your motor home has a wooden floor, you might need to utilize screws or nails to safeguard the table securely.
You can cover a bungee cord around your table and chairs to hold them all with each other. Products like shelves can be anchored to the wall.
Make certain to select screws that are much shorter than that a person. You don't have to worry about it punching via your Motor home's outside wall surface. Review my short article about protecting your items throughout travel for even more concepts! If you're still uncertain on whether to eliminate your dining room, give it a remodeling! Find motivation in these articles: If you have actually already planned to remove your dinette cubicle and simply require ideas of what to replace it with, look into these posts: With pointers from the leading recreational vehicle renovators, this quickstart painting overview will ensure your RV looks picture excellent.
We respect your privacy. Unsubscribe any time. Ashley Mann founded in 2017. She handed off the internet site to brand-new owners in 2022 to launch a brand-new business as an online business owner instructor, yet she still assists as the blog site editor. Ashley spent three years living full-time in a 38-foot, 5th-wheel motor home with her spouse Josiah and their feline, Feline.
Rv Dinette Booth Rowland Heights, CA
Recreational vehicle Furnishings also offers personalized specialized products for the RV market, such as home window coverings and wooden return air vents, to call a couple of. We have actually been providing the recreational vehicle market for 25+ years and are your one-stop-shop for a lot of your RV needs.
Okay, so for those of us bigger people available that discover the dining room table a limited fit below is what I did. I transformed it to a free standing table by adding various table legs. I mosted likely to my local motor home dealer and bought the folding table legs that I used to have on my Rockwood Pop Up.
See connected PDF for photos and documentation. It's not for everyone, however I sure more than happy with it.
Okay, so for those of us bigger folks around that locate the dining room table a limited fit here is what I did. I transformed it to a complimentary standing table by adding various table legs. I went to my local recreational vehicle dealership and acquired the folding table legs that I made use of to carry my Rockwood Turn up.
Rv Microwave Replacement Rowland Heights, CA
See connected PDF for photos and paperwork. It's except everyone, yet I sure am happy with it.
Wood seats bench with drawers, Sponge and PU for seating. Wood and stainless steel table.
Odd. They claim on their website: "This product may cost approximately $50.00, or a lot more, to ship using UPS Ground, or UPS Standard to Canada." Probably you simply need to talk with the right individual and factor the above out. I got among these tables yesterday, yet to the United States.
Regarding I can inform, the only genuine downside is that they can't be moved outside such as this table. One point that I assumed may be nice was the capability to eliminate the table to access the area under the seats, yet in reality there isn't any simple place to place the table inside the trailer, so you only get that benefit if you agree to move it completely outside or put it on top of the opposite seat.
Rv Restoration Companies Rowland Heights, CA
As an option, if you aren't space constrained, there are likewise fold up tables, such as this one: There is a likelihood we'll exist, and there is additionally a great chance I'll have made a decision by then regarding the Springfield/Dicor. I'll let you understand.
In my previous camper, I turned the table 45 degrees to make far better passage and got rid of 2 chairs. At some point, the table and chairs came out entirely when we obtained a true family, 3 seater, 2 recliner sofa.
I added more and had them throughout. They were so tiny, and because they were in carpet, you never ever discovered them whatsoever. They in fact was available in actual handy on the hide-a-bed sofa where that lower cabinet kept coming open when in transit. My existing camper has the very same hooks for the chairs, and I have actually included a couple of more in different places in the existing camper also.
Our company believe in using the really finest value, high quality, and option. Plus, we want you to enjoy your purchase! In case you desire to send out an item back to us, you might return most extra products for a reimbursement or exchange, minus delivery, within 90 days from the day of purchase unless noted listed below under exemptions and exemptions.
Rv Interior Remodel Rowland Heights, CA
A return consent will certainly be given, and, in every situation, we'll start to keep an eye out for your return. For web orders returned in-store, please take the item in initial packaging, along with the invoice to any type of Outdoor camping Globe retail places for a reimbursement or exchange.
Reimbursements for internet orders released in-store are able to be refunded to a PRESENT CARD or MAILED CHECK ONLY; some exemptions may apply. For retail purchases returned with an invoice, please return the extra and unopened thing, with the initial sales receipt, for a complete refund or exchange. Rv Interior Remodel Rowland Heights. All returns with a gift invoice will receive a shop debt for the amount of the product at the time of acquisition
OCRV Center
Address: 23281 La Palma Ave Yorba Linda, CA 92887Phone: (714) 909-1444
Email: art@ocrvcenter.com
OCRV Center
Appropriate ID will certainly be required in the kind of a valid, state-issued chauffeur's certificate or state ID card. We schedule the right to restrict or reject returns without a receipt. Great Sam Participants that have actually preserved a continuous active subscription status might return any type of unused and unopened product, bought on Feb .
Rv Chairs Rowland Heights, CARv Floor Replacement Rowland Heights, CA
Rv Replacement Awnings Rowland Heights, CA
Rv Interior Furniture Rowland Heights, CA
Rv Floor Replacement Rowland Heights, CA
Rv Dining Table Rowland Heights, CA
Rv Dinette Table Rowland Heights, CA
Rv Dinette Table Rowland Heights, CA
Rv Refrigerator Replacement Rowland Heights, CA
Rv Couch Bed Rowland Heights, CA
Rv Replacement Furniture Rowland Heights, CA
Rv Restoration Companies Rowland Heights, CA
Rv Chairs Rowland Heights, CA
Rv Dining Table Rowland Heights, CA
Rv Couch Rowland Heights, CA
Replacement Windows For Rv Rowland Heights, CA
Remodeling Rv Rowland Heights, CA
Rv Dinette Booth Rowland Heights, CA
Rv Sofa Beds Rowland Heights, CA
Rv Sofas Rowland Heights, CA
Rv Upholstery Rowland Heights, CA
Rv Sofa Beds Rowland Heights, CA
Rv Couch Rowland Heights, CA
Replacement Windows For Rv Rowland Heights, CA
Remodeling Rv Rowland Heights, CA
Remodeling Rv Rowland Heights, CA
Replacement Rv Windows Rowland Heights, CA
Replacement Rv Windows Rowland Heights, CA
Rv Couch Rowland Heights, CA
Replacement Rv Windows Rowland Heights, CA
Awning Installation Rowland Heights, CA
Rv Microwave Replacement Rowland Heights, CA
Rv Carpet Replacement Rowland Heights, CA
Replacement Rv Refrigerator Rowland Heights, CA
Rv Upholstery Rowland Heights, CA
Rv Dinette Table Rowland Heights, CA
Rv Sofa Sleeper Rowland Heights, CA
Rv Interior Remodel Rowland Heights, CA
Rv Sofa Beds Rowland Heights, CA
Replace Rv Flooring Rowland Heights, CA
Rv Sofa Sleeper Rowland Heights, CA
Awnings For Rv Rowland Heights, CA
Rv Upholstery Rowland Heights, CA
Rv Chairs Rowland Heights, CA
Rv Dinette Booth Rowland Heights, CA
Replacement Rv Windows Rowland Heights, CA
Replacement Rv Windows Rowland Heights, CA
Rv Sofas Rowland Heights, CA
Rv Refrigerator Replacement Rowland Heights, CA
Rv Refrigerator Replacement Rowland Heights, CA
Rv Carpet Installation Rowland Heights, CA
Rv Refrigerator Replacement Rowland Heights, CA
Rv Couch Rowland Heights, CA
Rv Carpet Replacement Rowland Heights, CA
Rv Refrigerator Replacement Rowland Heights, CA
Awnings For Rv Rowland Heights, CA
Rv Carpet Installation Rowland Heights, CA
Replace Rv Flooring Rowland Heights, CA
Replace Rv Flooring Rowland Heights, CA
Rv Dining Table Rowland Heights, CA
Rv Dining Table Rowland Heights, CA
Rv Refrigerator Replacement Rowland Heights, CA
Replace Rv Flooring Rowland Heights, CA
Remodeling Rv Rowland Heights, CA
Rv Dinette Table Rowland Heights, CA
Rv Carpet Replacement Rowland Heights, CA
Rv Sofa Sleeper Rowland Heights, CA
Awning Installation Rowland Heights, CA
Rv Carpet Replacement Rowland Heights, CA
Rv Couch Bed Rowland Heights, CA
Awning Installation Rowland Heights, CA
Rv Floor Replacement Rowland Heights, CA
Replacement Windows For Campers Rowland Heights, CA
Rv Sofas Rowland Heights, CA
Replacement Windows For Rv Rowland Heights, CA
Awnings For Trailers Rowland Heights, CA
Rv Restoration Companies Rowland Heights, CA
Rv Restoration Companies Rowland Heights, CA
Near Here Seo Service Rowland Heights, CA
Find Seo Package Rowland Heights, CA
OCRV Center
Table of Contents
- – Rv Sofa Sleeper Rowland Heights, CA
- – OCRV Center
- – Remodeling Rv Rowland Heights, CA
- – Rv Carpet Installation Rowland Heights, CA
- – Rv Sofa Beds Rowland Heights, CA
- – Rv Dining Table Rowland Heights, CA
- – Rv Microwave Replacement Rowland Heights, CA
- – Awnings For Rv Rowland Heights, CA
- – Awnings For Trailers Rowland Heights, CA
- – Rv Dinette Booth Rowland Heights, CA
- – Rv Microwave Replacement Rowland Heights, CA
- – Rv Restoration Companies Rowland Heights, CA
- – Rv Interior Remodel Rowland Heights, CA
- – OCRV Center
Latest Posts
Rv Delamination Repair Near Me Montclair
Hood Vent Cleaning Services San Marino
Central Air Conditioner Prices Sherman Oaks
More
Latest Posts
Rv Delamination Repair Near Me Montclair
Hood Vent Cleaning Services San Marino
Central Air Conditioner Prices Sherman Oaks