All Categories
Featured
Table of Contents
- – Rv Dinette Booth West Covina, CA
- – OCRV Center
- – Rv Sofa Sleeper West Covina, CA
- – Rv Interior Furniture West Covina, CA
- – Rv Interior Furniture West Covina, CA
- – Rv Microwave Replacement West Covina, CA
- – Rv Replacement Awnings West Covina, CA
- – Rv Microwave Replacement West Covina, CA
- – Rv Dining Table West Covina, CA
- – Rv Sofa Beds West Covina, CA
- – Rv Floor Replacement West Covina, CA
- – Rv Floor Replacement West Covina, CA
- – Rv Interior Remodel West Covina, CA
- – Rv Dinette Table West Covina, CA
- – OCRV Center
Rv Dinette Booth West Covina, CA
Prior to noontime Kerry called to inform me that they had the slide out and it would certainly be a great time ahead and obtain some images. I came by once again shortly after 4 pm and they had the new flooring cut, and David (pictured over) and Kerry had just glued the white protective Filon base on and had attached blue tape over the diagonal section which allows the flooring to rise and then slide along the carpeting of the internal floor of the motorhome.
So this is a thicker item of plywood, far better type of plywood, and all-time low will certainly still have the safety sheet over it to keep the water from hitting the wood. He also is replacing the trim which affixes the floor to the walls of the slide. They likewise had replace that black strip which the slide leaves the carpetthe old one remained in a squandered state.
Rv Sofa Sleeper West Covina, CA
After that they will certainly cut it to size, and mount the floor into the slide out, and essentially placed every little thing back together again. After a restless evening in the motel, I went back to McColloch's at 9 armed with a pair dozen donuts. Kerry was out, so I offered Nick the 2 boxes of donuts and told him that one of them was for the men throughout the street who helped with the slide.
While there David showed me how they were lining up the brand-new flooring to the old flooring to connect the parts which obtain connected to both arms that relocate the slide in and out. I was wanting to get a photo of them placing the slide in, so I returned at 1 pm and discovered the slide was currently in.
Kerry was satisfied of the donuts, and he said the individuals throughout the street obtained their box and were really appreciative of them. When I first talked to McColloch's about doing this task when we were still in Florida, we were informed that we required to be planned for it to be a 3-4 day job.
We are so happy that the work only took two days, which means just one night in a motel. Simply prior to 5 pm Kerry calls me and informs me that they are done. I was down at Arden Fair Shopping Mall so it was a quick drive over to the store.
Rv Interior Furniture West Covina, CA
This must last us a long, long period of time. Kerry claimed that the water invasion came the size of the slide, picture left. He showed me the floor, and it was in even worse form than that image I took and showed previously in this publishing. It had actually been something which had actually been taking place for lots of several years.
I have reviewed others who had actually slide floors changed, and couple of have actually paid less than this, many have actually paid a lot more (Rv Restoration Companies West Covina). This was a simple slide, yet I KNOW Kerry and his team did it right. Excellent quality item of lumber, Filon to safeguard the outside bottom (which was the most costly part of the materials made use of), 3-M tape, paint, and caulking in addition to numerous screws and equipment is the degree of the products utilized
The Filon is glued to the lumber and safeguards the outside base. The rug is stapled into the top of the flooring, and this floor is really really solidprobably far better than when it was new. We provide McColloch's motor home repair work and storage space two huge thumbs up. Now days it is coming to be rarer and rarer to locate trustworthy facilities to fix our motorhomes and Recreational vehicles.
While I still have some points to do for our remodeling, I am at a factor where I can call this reflooring task essentially total. I believed I would certainly make a good cover up message right here. Just how a lot did I end up costs on the work?
Rv Interior Furniture West Covina, CA
I started pulling the carpeting out on March 31. That's concerning a month and a fifty percent overall on the job. I was largely working on weekend breaks.
My wife and I flew to Paris, France in early April and were there for a week. I lost a week of working on the Motor home, but for a really worthy factor. I wound up shedding an additional weekend of job because I was waiting for Lowes to ship me the flooring I chose.
Definitely not a quick work! I had not been maintaining logs on points and there were a couple of purchases which most likely had some things which had not been meant for the Motor home.
The question is Exactly how a lot would certainly this have set you back if I had worked with the job out? Well, the solution is one heck of a great deal more than $1300! I didn't obtain any official estimates before I started.
Rv Microwave Replacement West Covina, CA
No wood flooring. Simply changing initial rug with new rug. The concern is that several rug people just don't desire a task like this.
It is a lot easier to generate income slapping carpet into stick-and-brick homes. For this reason, carpet installers for Recreational vehicles charge an arm and a leg for it. However, my task was harder. I drew out the laminate flooring. I re-floored a large portion with plastic slabs instead than carpet. I installed sound dampening.
All in all, I'm guessing that this task would have quickly been a $6,000-$7,000 task if I had actually employed it out. One point is for certain, it would have been expensive.
New flooring might make the rig easier to sell when the time comes, yet is it going to inherently make the motorhome a lot more valuable? I just do not think I might have brought myself to go down $7,000 on this task for a 2002 motorhome.
Rv Replacement Awnings West Covina, CA
I might as well conserve the cash on the flooring so I can spend some of the savings on that furnishings? That old rug was simply terrible. The entire look of the interior transformed with brand-new flooring.
Successive, there's obviously the financials. I truly do assume that $6,000 is a conservative price quote wherefore the task would certainly have price. I invested regarding $1,300. I saved AT LEAST around $4,700 by doing it myself. Likely a lot more than that. But, there's another element, as well. This task entailed me doing a whole lot of points I've never done.
I obtained several brand-new skills. I have some new tools to utilize in the future.
Rv Microwave Replacement West Covina, CA
You understand the work top quality. And I truthfully assume it runs and functions better that method. It is that human variable that assists keep these points in excellent shape.
Is the work ideal? Is it similarly as great as a pro would certainly have done? No. I indicate, as the man who did it, I see the imperfections. However, no one else would certainly. Generally, I assume it appeared damn excellent! I'll share an all new walk-through video of the whole thing once I obtain the new furniture in and the carpeting binding is done.
Rv Dining Table West Covina, CA
ISSUE: The bathroom was not firm on the floor. I got rid of the commode from the flooring and discovered the flange gasket undamaged yet the floor decomposed around the toilet flange. When removing the bathroom, I found the water supply fitting was loosened at the toilet. This enabled water to run down the supply line, drip onto the flooring, and run hidden over the edge of the vinyl right into the flange location of the floor.
This turned out to be a great selection as a result of the item itself AND the email assistance I obtained from Dr. Rot - Rv Restoration Companies West Covina. Adhering to are the steps I absorbed the repair work, with pictures for each and every step: Step One: Removed Commode and Analyzed DamageHere the bathroom and flange are removed. In our case the flange unscrews on its 3 female thread
About a square foot of the floor is deteriorated. The worst locations resemble damp coffee premises. The coach has a sheet metal base under the flooring and there are a couple inches of Styrofoam insulation in between. In this image, I have actually made use of a "hook blade" in the utility knife and have actually cut the vinyl floor covering far from the flange location.
Thetford sells a "pedestal" which raises recreational vehicle bathrooms to home toilet elevation. The pedestal has a much bigger footprint than a bathroom, and the faint line on the floor covering is the impact of the pedestal. The dark line is an inch in from the stand impact. I cut the floor covering out along that line.
Rv Sofa Beds West Covina, CA
Devices were a swiss army knife and a hoover. I laid out the holding tank inlet on a cardboard design template and cut the design template to fit the area where rotted OSB was gotten rid of. Step 2: Cut New OSB Repair Work Spot from TemplateIn this image, the spot is in place with the flange and stand bolts.
I have actually cut the flooring covering away from the wall behind the bathroom and the vanity next to the toilet to obtain better accessibility to the damages. I also made a cut near the far back corner to be able to raise the plastic out of the method. Step 3: Applied Rot Physician CPES * I got the Warm Climate Two-Pint System # 101 and blended a number of small sets for each application.
The damaged timber obtained company but not "new timber hard." I'm certain that rot was arrested and adequate stamina brought back. Notification that an opening showed up in between the two cans. It's not in an area that anyone can depend on, so I determined to only extend it with a little piece of sheet aluminum.
Rv Floor Replacement West Covina, CA
I used a woodworker's square to lay out the placing openings so the bathroom would go back in place right. Step 6: Floor covering ReinstalledI used prefinished quarter round molding and predrilled it for drywall screws. I eliminated the light weight aluminum piece revealing right here since it maintained the pedestal from relaxing level on the floor.
We are below to aid our consumers resolve their issues. Let us assist you to not have any kind of surprises in your repair service job. Our business hours are 6:30 AM to 5:30 PM Pacific Time, MondayFriday. Technology assistance is available over weekends and holidays 8:30 AM to 5:30 PM Pacific Time.
Rv Floor Replacement West Covina, CA
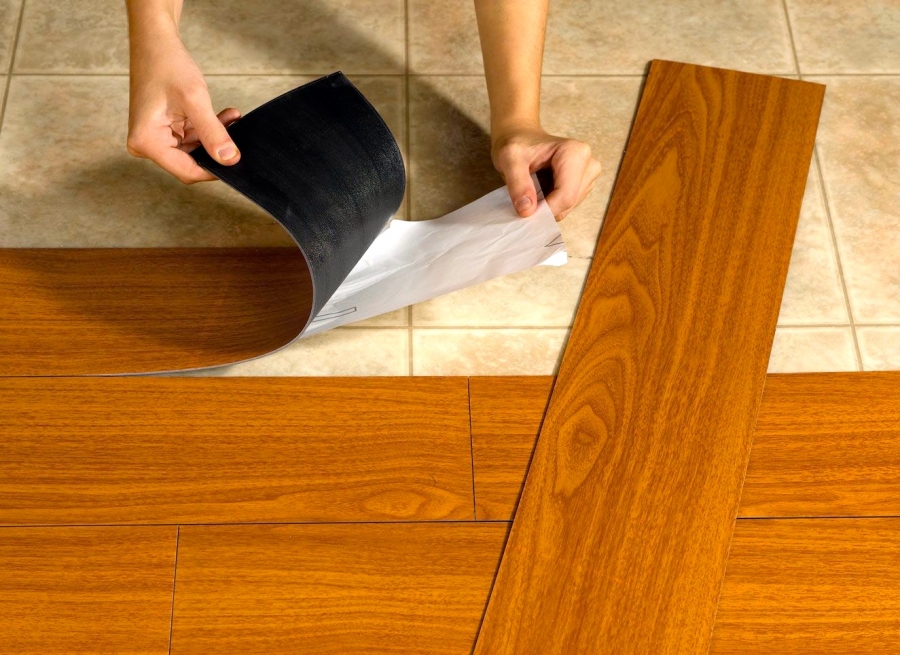
Have a look at the floor covering in your RV. Is it old? Moldy? Do you also like the shade, layout, or product? If you said yes to any one of those, it could be time for all new floor covering in your rig that you picked just for you. For nearly 14 years, Bradd & Hall has been changing and setting up brand-new floors in the Recreational vehicles of our consumers.
Among the most common floorings we set up is rug. Rug helps keep a constant temperature inside no matter the climate outside due to its wonderful insulation capabilities. Here are a couple of other amazing elements of rug: Affordable Easy to mount Easier for the senior and animals to walk on Among minority adverse aspects of carpeting is the capacity to draw in dirt and debris at a quite quick rate, so the upkeep is a little bit more than most other products.
Rv Interior Remodel West Covina, CA
It can be found in lots of various color alternatives, such as cherry, ash, and maple, and these colors can truly make your rig luster. Wood also comes in multiple textures, which is why it is among one of the most popular choices for motor home floor covering. It can be refinished, too, and that offers you choices to customize down the roadway without paying for brand-new product.
Ceramic is made from clay, so your floor tiles would be resistant to warm and can stand up to the roughest of direct influence. Ceramic also doesn't absorb wetness, making it a terrific alternative for those in rough environments. It's been known to last longer than a lot of the other flooring alternatives out there, too.
It is available in a countless amount of designs and color choices which make it among the most convenient ways to place your own design and personality in your gear. Vinyl is more economical than ceramic, however it's tough, so it makes a terrific choice for those trying to find an economical option.
Rv Dinette Table West Covina, CA

We wish this gets you began on the trip towards finding the ideal substitute floor covering for you. And, when you select us, understand you're obtaining top quality materials and customer support. Desiring to change any one of your RV furniture yet do not understand where to start? No concerns. Bradd and Hall has actually got you covered.
OCRV Center
Address: 23281 La Palma Ave Yorba Linda, CA 92887Phone: (714) 909-1444
Email: art@ocrvcenter.com
OCRV Center
When you pick us, you'll be greeted with a cozy smile as a friendly employee strolls you with our inventory. Our objective is to work directly with you to guarantee your absolute satisfaction throughout your remodel. When you're all set to get started, provide us a telephone call so we can direct you every action of the method.
Rv Carpet Replacement West Covina, CARv Dinette Table West Covina, CA
Rv Sofa Sleeper West Covina, CA
Rv Carpet Installation West Covina, CA
Rv Couch West Covina, CA
Remodeling Rv West Covina, CA
Awnings For Rv West Covina, CA
Rv Restoration Companies West Covina, CA
Rv Dining Table West Covina, CA
Motorhome Carpets West Covina, CA
Rv Dining Table West Covina, CA
Rv Dinette Table West Covina, CA
Rv Restoration Companies West Covina, CA
Rv Interior Furniture West Covina, CA
Rv Sofa Sleeper West Covina, CA
Rv Couch West Covina, CA
Rv Dinette Booth West Covina, CA
Rv Sofa Beds West Covina, CA
Rv Sofa Beds West Covina, CA
Rv Sofa Sleeper West Covina, CA
Rv Sofa Beds West Covina, CA
Rv Dinette Booth West Covina, CA
Rv Dinette Booth West Covina, CA
Replacement Rv Windows West Covina, CA
Replacement Rv Windows West Covina, CA
Replace Rv Flooring West Covina, CA
Remodeling Rv West Covina, CA
Rv Interior Furniture West Covina, CA
Rv Couch Bed West Covina, CA
Remodeling Rv West Covina, CA
Rv Carpet Replacement West Covina, CA
Rv Replacement Awnings West Covina, CA
Rv Carpet Installation West Covina, CA
Replace Rv Flooring West Covina, CA
Rv Carpet Replacement West Covina, CA
Rv Couch West Covina, CA
Replacement Windows For Rv West Covina, CA
Rv Refrigerator Replacement West Covina, CA
Rv Dinette Booth West Covina, CA
Awnings For Trailers West Covina, CA
Replacement Windows For Rv West Covina, CA
Rv Refrigerator Replacement West Covina, CA
Replacement Rv Refrigerator West Covina, CA
Rv Sofa Beds West Covina, CA
Rv Sofa Sleeper West Covina, CA
Replacement Rv Windows West Covina, CA
Rv Sofa Beds West Covina, CA
Rv Restoration Companies West Covina, CA
Rv Dinette Table West Covina, CA
Rv Floor Replacement West Covina, CA
Rv Refrigerator Replacement West Covina, CA
Rv Dinette Booth West Covina, CA
Rv Floor Replacement West Covina, CA
Rv Floor Replacement West Covina, CA
Replace Rv Flooring West Covina, CA
Rv Carpet Replacement West Covina, CA
Replace Rv Flooring West Covina, CA
Rv Chairs West Covina, CA
Awnings For Rv West Covina, CA
Rv Interior Remodel West Covina, CA
Rv Upholstery West Covina, CA
Rv Dining Table West Covina, CA
Replacement Rv Refrigerator West Covina, CA
Rv Interior Furniture West Covina, CA
Rv Replacement Furniture West Covina, CA
Replacement Rv Refrigerator West Covina, CA
Rv Sofa Sleeper West Covina, CA
Rv Restoration Companies West Covina, CA
Rv Sofa Beds West Covina, CA
Rv Dinette Table West Covina, CA
Rv Dining Table West Covina, CA
Rv Dining Table West Covina, CA
Replacement Windows For Campers West Covina, CA
Rv Floor Replacement West Covina, CA
Rv Interior Furniture West Covina, CA
Replacement Windows For Rv West Covina, CA
Rv Sofas West Covina, CA
Rv Dining Table West Covina, CA
Companies Near Me Seo Agencies West Covina, CA
Best Seo Services West Covina, CA
OCRV Center
Table of Contents
- – Rv Dinette Booth West Covina, CA
- – OCRV Center
- – Rv Sofa Sleeper West Covina, CA
- – Rv Interior Furniture West Covina, CA
- – Rv Interior Furniture West Covina, CA
- – Rv Microwave Replacement West Covina, CA
- – Rv Replacement Awnings West Covina, CA
- – Rv Microwave Replacement West Covina, CA
- – Rv Dining Table West Covina, CA
- – Rv Sofa Beds West Covina, CA
- – Rv Floor Replacement West Covina, CA
- – Rv Floor Replacement West Covina, CA
- – Rv Interior Remodel West Covina, CA
- – Rv Dinette Table West Covina, CA
- – OCRV Center
Latest Posts
Rv Delamination Repair Near Me Montclair
Hood Vent Cleaning Services San Marino
Central Air Conditioner Prices Sherman Oaks
More
Latest Posts
Rv Delamination Repair Near Me Montclair
Hood Vent Cleaning Services San Marino
Central Air Conditioner Prices Sherman Oaks