All Categories
Featured
Table of Contents
- – Motorhome Roof Replacement Diamond Bar, CA
- – OCRV Center
- – Rv Rubber Roof Repair Diamond Bar, CA
- – Rv Roof Leak Repair Near Me Diamond Bar, CA
- – Rv Rubber Roof Replacement Cost Diamond Bar, CA
- – Rubber Roofing For Campers Diamond Bar, CA
- – Best Rv Roof Repair Diamond Bar, CA
- – Rv Roof Repair Service Near Me Diamond Bar, CA
- – Rv Slide Out Roof Repair Diamond Bar, CA
- – Rv Trailer Roof Repair Diamond Bar, CA
- – OCRV Center
Motorhome Roof Replacement Diamond Bar, CA
In this article, we intend to share with you just how to do it yourself RV roof covering fixing. Residing in a RV has incredible moments, yet points additionally go incorrect. Recognizing just how to DIY a great deal of the things that can break or screw up will certainly conserve you not only a whole lot of cash on recreational vehicle fixings but can likewise save you a lot of potential time in the shop! This post might consist of associate web links.
I may receive a little payment when you buy using my web link. We attempt to intend our paths very carefully to stay clear of low-hanging objects over the road. Often though, we locate ourselves in unplanned circumstances. This is just how we wound up with a couple of small rips on the roof of our recreational vehicle.
Rv Rubber Roof Repair Diamond Bar, CA
We thought we were free from the branches, but we wound up catching a few of them on the much left side of the roofing. There were a total of 4-5 little openings in the side of the roof. Initially, we didn't examine the roofing due to the fact that we didn't think we hit anything.

Throughout the tornado, we found that we had a percentage of water dripping through one of the lights in the shower room. The good news is we did not wind up with any type of permanent water damage. After the tornado, Tucker went up on the roof covering which is when he found the openings.
Rv Roof Leak Repair Near Me Diamond Bar, CA
You'll want to clean the area around the tear that you will certainly be patching well. To clean the roof covering, use scrubing alcohol and either a cloth or paper towels.

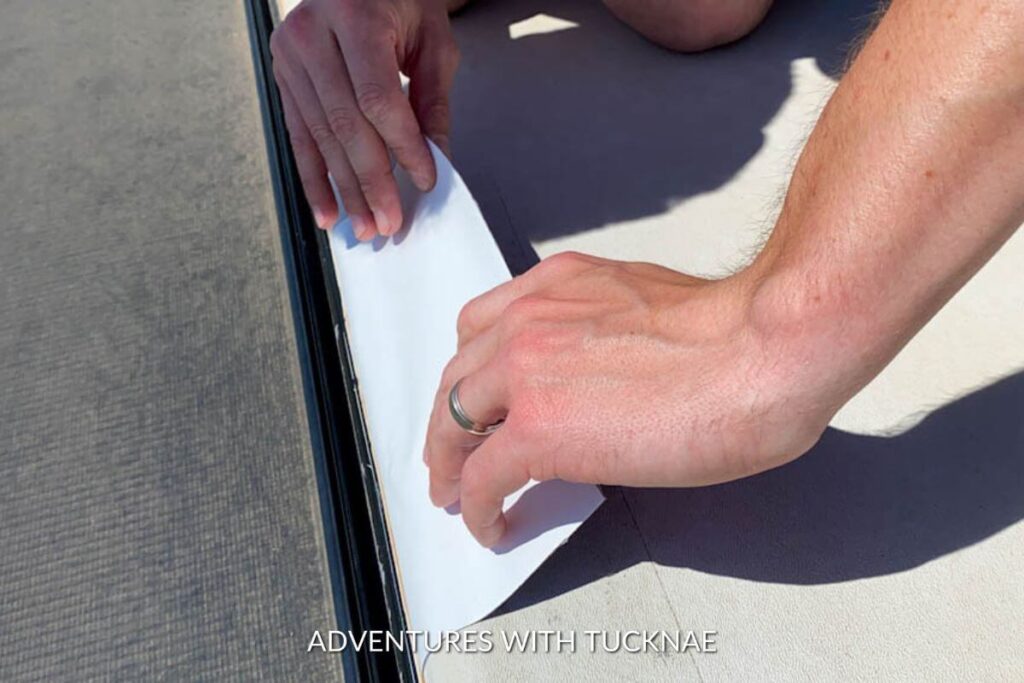
Allow it dry totally before proceeding. Applying the Externabond tape After the area has actually completely dried out from cleansing, it's time to include the Eternabond tape. Diamond Bar Rubber Roofing For Campers, which is a motor home roof covering fixing tape. Eternabond makes the most effective motor home roof covering tapes and is an excellent item to carry hand for the emergency repair of a leaky roofing.
Rv Rubber Roof Replacement Cost Diamond Bar, CA
Get rid of the support and use carefully over the tear in the roofing system. Once it has touched the roofing system it sticks pretty rapidly so you'll intend to make sure and placement it right the very first time. Begin with one side and smooth it out. Press strongly and proceed to scrub it and smooth out the spot for numerous minutes.
This rubber sealant creates a safe and secure additional seal on your rubber roof covering and ensures that the leak is correctly sealed. This is likely the exact same sealer that was made use of on your recreational vehicle roofing system to seal around the roof vents, a/c unit, and so on. There are a whole lot of Dicor recreational vehicle roofing fixing products that you can acquire including roof finishes, roof covering sealant, and much more for the surface of your roofing.
If the damage is on the edge of your camper roof covering like ours was, you may have some Dicor that runs down the side. Wipe any type of excess off and don't enable it to diminish also much. This is a self-leveling sealant so you must wind up with a fairly level spot.
Rubber Roofing For Campers Diamond Bar, CA
Over time, it will completely solidify and you won't have to fret regarding it anymore. After the Dicor lap sealant was applied If the leakage in your motor home roofing system is a tiny area, the very best means to repair it is to follow our step-by-step guide and fix the damaged location on your own to deal with the small leak
A basic recreational vehicle roof repair, as we did on our repair task, is relatively affordable and need to cost much less than $50 for do it yourself RV proprietors. To replace an entire RV roofing with considerable damage would certainly lead to much even more expensive repair services. I hope that you have discovered the info in this blog post practical.
Best Rv Roof Repair Diamond Bar, CA
This will certainly give you assurance and confirm that your roofing remains in excellent shape. Exactly how to Do It Yourself Your Motor Home Roof Covering Repair Work.
If you don't examine, reseal, and fix your RV roof routinely, you will certainly end up with some beautiful awful water damage. This is something that will swiftly reduce the value of your recreational vehicle and can also render it pointless. Thankfully, looking after your motor home roofing system is something you can possibly do all on your own.
After concerning ten years, it will likewise be necessary to reseal the whole roofing system. To do this, you'll require to climb up onto the roof covering, yet be really careful when you do. Are you certain it's solid enough to sustain you? Is there a ladder at the back? If not, it more than likely isn't solid sufficient to be walked on.
Next, you'll intend to clean your roofing extensively, so as to get rid of any type of dust fragments. You can utilize a lengthy handled brush for this, yet never make use of a cleaner which contains petroleum solvents or citrus active ingredients on your rubber or vinyl roofing. These kinds of cleansers will create irreversible damage to the surface.
Rv Roof Repair Service Near Me Diamond Bar, CA
While you're cleaning, scratch off any debris or old roofing system product, yet take care while you do this as you might conveniently elongate a tear, or perhaps punch an opening via the roof covering. You need to then dry the roof as best as you can. Keep In Mind: Rubber motor home roof coverings can be extremely slippery when wet.
After the roofing is tidy, you are going to wish to check the seams for openings, cracks or peeling, so you can reseal anywhere necessary. You'll want to make a factor of resealing all joints once a year whether or not they show indications of wear.
Rv Slide Out Roof Repair Diamond Bar, CA
When it involves selecting the most effective RV roofing sealant, you'll wish to take into consideration whether you are repairing a tear, resealing a joint, or sealing the entire roofing. The kind of roofing system is also essential to keep in mind, as RV roofs can be made from either EPDM (Ethylene Propylene Diene Monomer) and TPO (Thermal Polyolefin) and you require the item you make use of to be suitable with your roofing kind.
Dicor Self-Leveling Lap Sealant is a great choice for reviewing old roofing seals. It can be made use of for spot securing or to reseal every seam on the recreational vehicle roof. Simply clean the location well and apply with a caulk weapon. Right stuff will level itself out, so do not bother with that component.
Rv Trailer Roof Repair Diamond Bar, CA
Similar to the EPDM system detailed above, this coating item will certainly cover your TPO roof covering and help it last another 10 years. Prior To EPDM and TPO, metal was the material of choice for RV roofings.
The aforementioned EternaBond is still king when it comes to repairing tiny damages on a steel roof covering. Recreational vehicle steel roof coverings do need to be totally resealed from time to time.
Best Rv Roof Repair Diamond Bar, CARv Roof Maintenance Diamond Bar, CA
Rubber Roof Installation Diamond Bar, CA
Rubber Roofing For Campers Diamond Bar, CA
Best Rv Roof Repair Diamond Bar, CA
Rv Rubber Roof Replacement Diamond Bar, CA
Replace Rv Roof Diamond Bar, CA
Best Rv Roof Repair Diamond Bar, CA
Rubber Roof For Camper Diamond Bar, CA
Rv Roof Leak Repair Diamond Bar, CA
Class C Rv Roof Repair Diamond Bar, CA
Resealing Rv Roof Diamond Bar, CA
Rv Slide Out Roof Repair Diamond Bar, CA
Rv Roof Maintenance Diamond Bar, CA
Rv Roof Leak Repair Near Me Diamond Bar, CA
Rv Trailer Rubber Roof Repair Diamond Bar, CA
Rv Trailer Roof Repair Diamond Bar, CA
Rv Rubber Roof Replacement Diamond Bar, CA
Rv Rubber Roof Maintenance Diamond Bar, CA
Rv Roof Maintenance Diamond Bar, CA
Rv Rubber Roof Replacement Cost Diamond Bar, CA
Rv Trailer Roof Repair Diamond Bar, CA
Rv Rubber Roof Replacement Diamond Bar, CA
Rv Slide Out Roof Repair Diamond Bar, CA
Motorhome Roof Replacement Diamond Bar, CA
Rv Roof Repair Service Near Me Diamond Bar, CA
Rv Roof Leak Repair Near Me Diamond Bar, CA
Rv Roof Leak Repair Near Me Diamond Bar, CA
Rubber Roof Installation Diamond Bar, CA
Rubber Roofing For Rv Diamond Bar, CA
Rv Roof Leak Repair Near Me Diamond Bar, CA
Rv Roof Repair Near Me Diamond Bar, CA
Rv Roof Leak Repair Diamond Bar, CA
Motorhome Roof Replacement Diamond Bar, CA
Rv Rubber Roof Repair Diamond Bar, CA
Best Rv Roof Repair Diamond Bar, CA
Rubber Roofing For Rv Diamond Bar, CA
Rv Fiberglass Roof Repair Diamond Bar, CA
Epdm Rv Roof Repair Diamond Bar, CA
Rv Roof Replacement Diamond Bar, CA
Rv Roof Leak Repair Near Me Diamond Bar, CA
Motorhome Roof Replacement Diamond Bar, CA
Rv Roof Repair Diamond Bar, CA
Rv Trailer Rubber Roof Repair Diamond Bar, CA
Rv Rubber Roof Replacement Cost Diamond Bar, CA
Class C Rv Roof Repair Diamond Bar, CA
Rv Roof Leak Repair Near Me Diamond Bar, CA
Rubber Roofing For Campers Diamond Bar, CA
Rv Rubber Roof Replacement Diamond Bar, CA
Rubber Roof For Camper Diamond Bar, CA
Rv Rubber Roof Repair Diamond Bar, CA
Rubber Roof Installation Diamond Bar, CA
Rv Trailer Roof Repair Diamond Bar, CA
Class C Rv Roof Repair Diamond Bar, CA
Rv Rubber Roof Repair Diamond Bar, CA
Resealing Rv Roof Diamond Bar, CA
Rv Roof Replacement Diamond Bar, CA
Rv Slide Out Roof Repair Diamond Bar, CA
Resealing Rv Roof Diamond Bar, CA
Rv Rubber Roof Maintenance Diamond Bar, CA
Rv Trailer Roof Repair Diamond Bar, CA
Rubber Roof Installation Diamond Bar, CA
Rv Roof Repair Diamond Bar, CA
Resealing Rv Roof Diamond Bar, CA
Rubber Roof For Rv Diamond Bar, CA
Rv Fiberglass Roof Repair Diamond Bar, CA
Rv Slide Out Roof Repair Diamond Bar, CA
Rv Rubber Roof Maintenance Diamond Bar, CA
Rv Rubber Roof Repair Diamond Bar, CA
Rubber Roof For Camper Diamond Bar, CA
Rv Roof Repair Fiberglass Diamond Bar, CA
Rv Roof Repair Service Near Me Diamond Bar, CA
Rubber Roof Installation Diamond Bar, CA
Rubber Roofing For Campers Diamond Bar, CA
Rv Fiberglass Roof Repair Diamond Bar, CA
Rubber Roof For Rv Diamond Bar, CA
Replace Rv Roof Diamond Bar, CA
Rubber Roof Installation Diamond Bar, CA
Around Here Seo Services Near Me Diamond Bar, CA
Close To Me Seo Services For Small Business Diamond Bar, CA
OCRV Center
Table of Contents
- – Motorhome Roof Replacement Diamond Bar, CA
- – OCRV Center
- – Rv Rubber Roof Repair Diamond Bar, CA
- – Rv Roof Leak Repair Near Me Diamond Bar, CA
- – Rv Rubber Roof Replacement Cost Diamond Bar, CA
- – Rubber Roofing For Campers Diamond Bar, CA
- – Best Rv Roof Repair Diamond Bar, CA
- – Rv Roof Repair Service Near Me Diamond Bar, CA
- – Rv Slide Out Roof Repair Diamond Bar, CA
- – Rv Trailer Roof Repair Diamond Bar, CA
- – OCRV Center
Latest Posts
Rv Delamination Repair Near Me Montclair
Hood Vent Cleaning Services San Marino
Central Air Conditioner Prices Sherman Oaks
More
Latest Posts
Rv Delamination Repair Near Me Montclair
Hood Vent Cleaning Services San Marino
Central Air Conditioner Prices Sherman Oaks