All Categories
Featured
Table of Contents
- – Rv Exterior Paint Walnut, CA
- – OCRV Center
- – Motorhome Custom Paint Walnut, CA
- – Rv Paint Repair Walnut, CA
- – Rv Paint Walnut, CA
- – Painting Rv Walnut, CA
- – Rv Painting Walnut, CA
- – Custom Painted Motorhomes Walnut, CA
- – Motorhome Paint Repair Walnut, CA
- – Rv Paint Job Walnut, CA
- – Painting Rv Exterior Walnut, CA
- – Painting Fiberglass Motorhome Walnut, CA
- – Motorhome Paint Shops Walnut, CA
- – Custom Rv Paint Walnut, CA
- – Paint Fiberglass Rv Walnut, CA
- – Painting An Rv Walnut, CA
- – OCRV Center
Rv Exterior Paint Walnut, CA
We discussed trading her in, however I'm so pleased we made a decision to paint it instead. You can inform every person likes what they do, and they are actually good at it also. Honestly can't state enough great points about our experience with CDI.
This aesthetic image is a depiction of what your trainer will certainly appear like with the shades and design you have actually chosen. Be sure to see our graphic design web page to attract inspiration for your very own customized paint work. You'll locate a slideshow of a number of past paint style makings we have actually done on systems consisting of 5th wheels, Course C, Course A and even more!.
After mindful consideration, Household Motor home Association will certainly be stopping briefly the Discussion forums efficient. One of the major obstacles is that the discussion forum software application we've relied on for over a years is no longer suitable with present systems without significant redevelopment.
Motorhome Custom Paint Walnut, CA
It's clear that participants are now linking and sharing experiences on newer systems that far better match modern assumptions and lifestyles. Pausing the online forums provides us the chance to re-evaluate how we can provide a more modern, easily accessible, and appealing area for our members to attach. We're incredibly grateful to those of you that have added to the discussion forums over the years.
I understand I'm going to obtain some flack for this and some individuals are mosting likely to drink their heads and elevate some brows. I do not adhere to the rules for auto-body painting and maybe not even for camper paint. Below's why, That's right. I do not spray it, I don't use car paint.
Rv Paint Repair Walnut, CA
In some cases I don't also eliminate the stickers (gasp!). Am I humiliated to be seen with it after it has been repainted? Am I stressed regarding it now?
I always analyze a job prior to diving in and making use of any one technique. I will certainly always examine the decals and effort to eliminate them first. If you want to try to remove the stickers, you will intend to attempt the following supplies: The appropriate means to repaint a motor home exterior involves getting rid of stickers, power washing, taping and covering windows and afterwards splashing on an automobile quality paint with a paint sprayer.
Rv Paint Walnut, CA
If you have actually been averted at certain campgrounds based on your RV's look, you ought to paint. Walnut Rv Paint. Below is what I do to prep the surface area prior to paint: Gently sand locations where the decals are gurgling or peeling off up Power laundry everything, including the roof Permit to completely dry completely Seal up edges and around all windows with a paintable caulk
I assume getting rid of stickers from a smooth-sided trailer is much easier. I will always examine stickers and attempt to eliminate them, yet if they look like they aren't going anywhere and the camper is more than 20 years old, I will likely simply repaint over them.
Painting Rv Walnut, CA
Our much older RV with smooth sides is holding well. The more recent trailer with wavy sides began to raise a little and I needed to repair the paint. I think newer stickers may at some point bubble and lift, however if your RV is older than 20 years, they sit tight.
I always recommend making use of a great gripping guide initially, since it's tough to predict exactly how well paint will certainly follow different surfaces. If you are painting right over an aluminum-sided trailer, you will intend to make use of a primer that is implied for direct-to-metal application. Walnut Rv Paint. With that said stated, I have had rather great success with Behr Marquee outside paint and primer in one
It has actually generally been covered in one layer and stood up well. I made use of a reduced gloss shine (eggshell) on the outside of our 50's vintage trailer since there were so many damages and flaws in the home siding and I desired a coating that would camouflage them better. The drawback to this is that dirt doesn't glide off or clean off as great as a high gloss.
I was hesitant to repaint over the decals on our present motor home with a semi-gloss paint, however I wanted to see if a semi-gloss would certainly show up extra professional. I'm uncertain I actually see much of a distinction. Grasping Primer Latex Paint 3/8 nap roller (you can likewise use 1/4 snooze or a foam roller for a smoother finish) Tilted brush * I experimented with an oil based paint once and it cracked and flaked off! Oil based dries to a tougher coating which may be also stiff for a moving automobile (at least that's my concept).
Rv Painting Walnut, CA
Ultimately, I simply went all out and never looked back! So why did I choose to roll the paint as opposed to spraying it? Well, I'm simply extra confident with a roller. I have actually never ever been a follower of taping and covering every little thing as much as safeguard it from the more than spray.
Would certainly a sprayer create a more also, smooth coating? Most likely, yes. But, due to painting over the stickers, I have actually constantly figured the roller will certainly produce a slightly textured finish that will conceal the decals. As soon as the paint has actually dried and healed, I included enjoyable plastic stickers! I saw to it the surface was clean and dry prior to using.
Custom Painted Motorhomes Walnut, CA
I likewise got an enjoyable vanity plate for the front of the camper. I additionally repainted the door pink! I am always asked just how well this method holds up. In my experience, you may have little places that need touching up after a season of traveling, but overall it holds well.

These high traffic locations take quite a pounding, but also so, I have just ever before seen mild cracking occur with time. Generally, I really feel that the renovation I receive from paint and simplicity of this approach deserve a few little chips occasionally. I constantly keep paint on hand for repair.
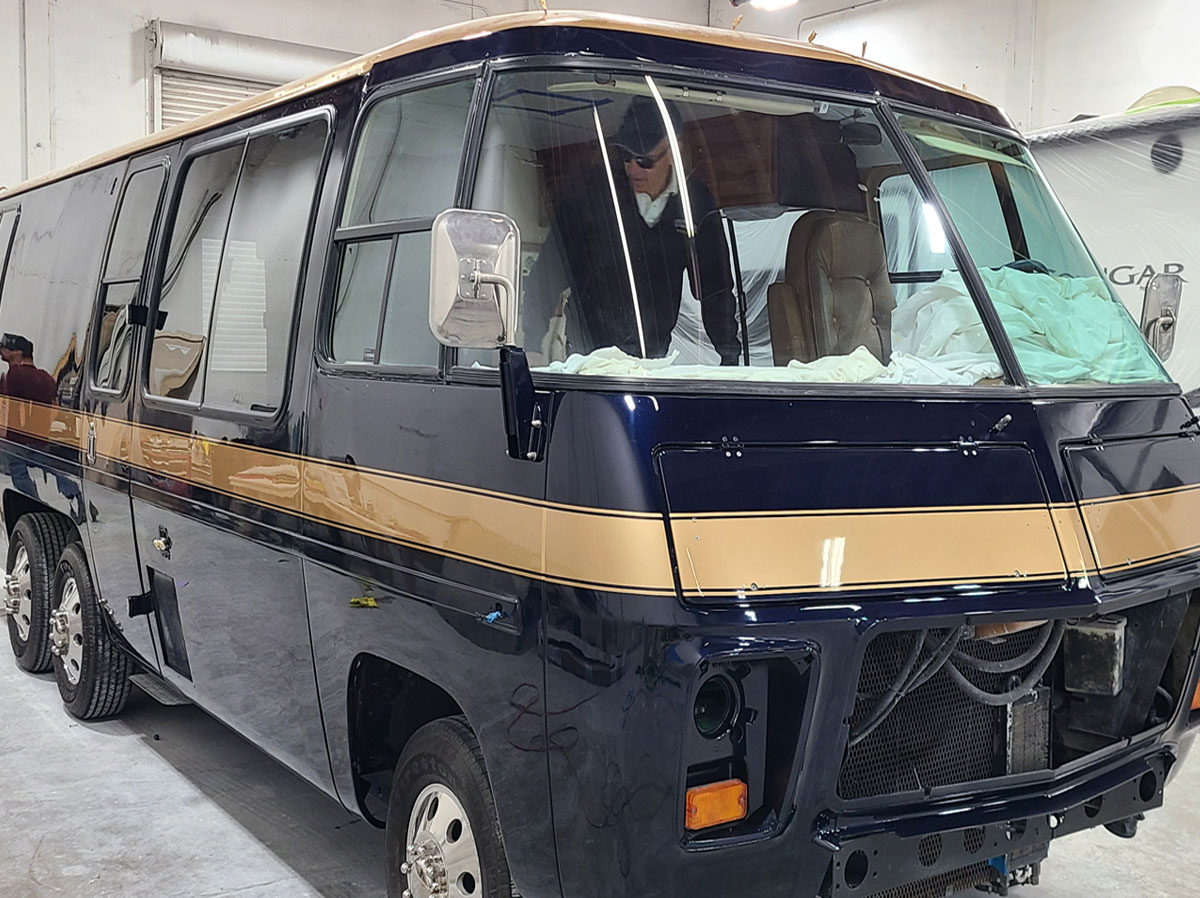
Paint & Body Windscreen Repair Inside Makeover Roofing System & Ceiling Repair service Customization Don't worry! Our group of motor home paint and body experts is here to assist. With our knowledge and modern centers, we can restore your motor home to its previous magnificence. Whether you require a, specialist,, or minor touch-ups, we've obtained you covered at our motor home paint and body store in Everett, Washington.
Inspect out our past motorhome paint and body tasks, and arrange a consultation with us today to! At our shop, we provide and fix services for both mechanized and towable coaches, consisting of and fixings. It is necessary to keep in mind that in some motorhomes, the windshield should be resealed every few years to keep a water tight gasket.
Motorhome Paint Repair Walnut, CA
I wax it as soon as a year with a top quality wax and when I wash it I NEVER completely dry it ... simply air dry. And that knows, when it's time to offer, it might be a lot more enticing than a non repainted one?
When it pertains to tailoring your motorhome, among the largest choices you'll encounter is whether to wrap or paint your motor home. Both options can provide your lorry a fresh, tailored lookbut they include really various costs, processes, and lasting ramifications. For several motor home proprietors, paint might appear like the standard route, but it usually features a significant price and long-term results.
In this write-up, we'll compare vinyl covering vs. painting a motorhome, breaking down the crucial distinctions in expense, toughness, upkeep, and style. If you're on the fencing about which alternative is best for your motor home, this guide will certainly help you make a confident choice. Plastic covering involves using a big adhesive film straight over the recreational vehicle's exterior.
Rv Paint Job Walnut, CA
Painting a RV can take numerous weeks, particularly when factoring in fining sand, priming, and drying out times. A plastic cover, by contrast, can be completed in just a couple of days, permitting you to get back on the road much faster. Wrapped Recreational vehicles need less effort to keep tidy. There's no need for waxing or polishing, simply wash it with moderate soap and water.
These are significantly prominent for individual Recreational vehicles due to their smooth, underrated design. Add a premium or futuristic side to your motorhome with metallic or chrome-effect vinyl. Offered in silver, gold, copper, and even color-shifting choices, these covers are ideal for those who want to stand apart. Distinctive vinyl wraps imitate the appearance of genuine materials while including deepness and responsive allure.
Perfect for: Organization branding and mobile marketing Themed Motor homes for events or celebrations Personalized art work or family members names Love the outdoors? Nature-themed wraps can include mountains, forests, oceans, or deserts, ideal for adventure applicants that desire their motorhome to show their way of life and travel destinations. You do not have to wrap the whole motor home to make a statement.
It safeguards your paint and can be removed easily if applied effectively. The surface area needs to be smooth and tidy for correct attachment.
Painting Rv Exterior Walnut, CA
Plus, we share leading product recommendations so your camper comes out looking fresh. To provide both rigs a fresh brand-new appearance, this is the outside painting technique that we advise. Desire to inspect out both restorations?
1 your camper's exterior to remove any kind of dust and road grime. Be sure to get rid of all stickers from locations that you plan to paint. Never repaint over decals. I recommend utilizing a decal eliminator tool to eliminate any kind of stickers conveniently. Use a warmth weapon to warm the sticker so that you can draw off the vinyl by hand.
Painting Fiberglass Motorhome Walnut, CA
Utilize the masking paper to obstruct off bigger areas from the overspray. 4 After you have actually taped off the locations you wish to repaint, sand down all locations of the camper that you prepare to repaint. Use an 80 grit sanding block and gently buff the exterior to create a smooth surface.
5 Next, wipe down the Recreational vehicle's outside with acetone and a microfiber towel to remove any kind of oily deposit that could stop great bond. Dust from fining sand will destroy the paint texture.
Motorhome Paint Shops Walnut, CA
If the paint looks unequal after drying out, mess up the surface once more and use another layer of paint. Relying on the problem that your RV's exterior remained in and exactly how well you performed in your prep work, you may need 2-3 layers of paint for a solid, smooth surface. 10 After the second (or third) layer of paint is dry, apply a clear overcoat.
This site makes use of cookies to assist personalise material, tailor your experience and to maintain you logged in if you sign up. By proceeding to utilize this site, you are consenting to our use cookies.
Find out about the recent uptick in van modifications, repaint modifications, body repairs, and facility upgrades needed to fulfill the greater demand for recreational vehicle painting solutions. To get more information regarding CDI Custom Paint examine them out below They have some fantastic examples of in the past and after photos of work they have done as well as video clips.
Find out how you can easily locate Clean Tank dealership solutions and utilize the increasing supplier network. The section additionally distinguishes the prevalence of expert tank cleansing services over typical market alternatives, stressing a specialized procedure that prevents waste build-up in holding tanks. In addition, the podcast discuss the synergy in between a cleansing solution business and the FMCA, presenting exclusive price cuts for FMCA participants.
Custom Rv Paint Walnut, CA
To get more information regarding Kleen Tank and obtain the cost-free dish for a powerful container solution visit them below and if you are in the North Carolina location contact Jack straight at 252-236-1023. Have an inquiry for us? Want to request a particular visitor on the show? Leave us a message down in the remark area or through our Get in touch with United States web page.
We talked with individuals from Mike's Personalized Paint in Bremen, In. Regarding doing a total repaint of our 1999 DSDP.From what they said, and what you can see on their web site, I have little uncertainty they would do a very first price task.
Quality of products and handiwork are what I'm trying to find. If you have remarks you prefer to not publish on the online forum, please send them to me at:! Bob.
Understood as chameleon paint, this paint work changes in color depending on the checking out angle and light resource. It needs a three-stage painting process.
Paint Fiberglass Rv Walnut, CA
Look up in the proprietor's manual for referrals on the TSP you can make use of to get rid of all the dirt and gunk. As soon as this is done, use the hand-masker dispenser to cover up all locations that you intend not to repaint on.
Use a good-quality product for an extensive and professional finish. Typically, latex-based guides function much better on camper walls as compared to oil-based guides, which are ideal for the concrete wall surfaces of homes.
Painting An Rv Walnut, CA
As soon as the primer is dry, now is the moment to paint. Select a paint kind according to the support of the camper's OEM and limit your checklist of preferred shades. You can do an area examination with a few of your recommended colors and see the effects. Use the various application modes to see what would certainly ideal fit your design: brushes, a sprayer, or a roller.
OCRV Center
Address: 23281 La Palma Ave Yorba Linda, CA 92887Phone: (714) 909-1444
Email: art@ocrvcenter.com
OCRV Center
6. If you are a pro at it, you can do an excellent work with brushes and rollers. Wait for a layer to completely dry correctly prior to you use the 2nd one. For painting the ceilings and closets, you can utilize the sprayer. This will speed up the job and provide a professional finish to the job.
Painting An Rv Walnut, CARv Paint And Body Shops Near Me Walnut, CA
Rv Paint And Body Shops Near Me Walnut, CA
Custom Painted Motorhomes Walnut, CA
Rv Painting Walnut, CA
Rv Paint And Body Shops Near Me Walnut, CA
Rv Paint And Repair Walnut, CA
Rv Exterior Paint Walnut, CA
Rv Paint Shop Near Me Walnut, CA
Rv Paint Job Walnut, CA
Motorhome Custom Paint Walnut, CA
Rv Painter Walnut, CA
Rv Paint Job Walnut, CA
Painting Rv Walnut, CA
Paint Rv Walnut, CA
Painting Rv Walls Walnut, CA
Rv Exterior Paint Walnut, CA
Rv Painting Near Me Walnut, CA
Rv Paint Repair Walnut, CA
Motorhome Paint Shops Walnut, CA
Rv Paint Job Walnut, CA
Paint Rv Walnut, CA
Painting Rv Exterior Walnut, CA
Rv Painting Near Me Walnut, CA
Class A Rv Custom Paint And Repair Walnut, CA
Painting Fiberglass Motorhome Walnut, CA
Paint Motorhome Exterior Walnut, CA
Class A Rv Custom Paint And Repair Walnut, CA
Motorhome Custom Paint Jobs Walnut, CA
Rv Paint Walnut, CA
Custom Rv Paint Walnut, CA
Rv Painter Walnut, CA
Rv Painting Walnut, CA
Painting Rv Walls Walnut, CA
Paint Fiberglass Rv Walnut, CA
Rv Paint And Repair Walnut, CA
Rv Exterior Paint Walnut, CA
Painting Rv Exterior Walnut, CA
Rv Paint And Body Shops Near Me Walnut, CA
Paint Rv Walnut, CA
Motorhome Custom Paint Jobs Walnut, CA
Painting Rv Walnut, CA
Painting Fiberglass Motorhome Walnut, CA
Motorhome Painting Walnut, CA
Painting Rv Exterior Walnut, CA
Custom Rv Paint Jobs Walnut, CA
Rv Paint And Repair Walnut, CA
Rv Paint Shop Near Me Walnut, CA
Rv Paint Shops Near Me Walnut, CA
Custom Painted Motorhomes Walnut, CA
Rv Paint Walnut, CA
Rv Painter Walnut, CA
Painting Rv Exterior Walnut, CA
Rv Paint Job Walnut, CA
Motorhome Painting Near Me Walnut, CA
Custom Rv Paint Walnut, CA
Rv Paint Walnut, CA
Custom Rv Paint Walnut, CA
Custom Rv Paint Walnut, CA
Rv Paint Shop Near Me Walnut, CA
Rv Paint Repair Walnut, CA
Motorhome Paint Shops Walnut, CA
Class A Rv Custom Paint And Repair Walnut, CA
Paint Fiberglass Rv Walnut, CA
Custom Motorhome Paint Jobs Walnut, CA
Painting Fiberglass Motorhome Walnut, CA
Motorhome Custom Paint Walnut, CA
Painting Fiberglass Motorhome Walnut, CA
Rv Paint Shop Near Me Walnut, CA
Rv Exterior Paint Walnut, CA
Rv Painter Walnut, CA
Painting Fiberglass Motorhome Walnut, CA
Rv Painting Walnut, CA
Painting Rv Walls Walnut, CA
Rv Painting Walnut, CA
Painting Fiberglass Motorhome Walnut, CA
Custom Motorhome Paint Jobs Walnut, CA
Custom Painted Motorhomes Walnut, CA
Close To Me Seo Companies Walnut, CA
Close To Me Seo Marketing Agency Walnut, CA
OCRV Center
Table of Contents
- – Rv Exterior Paint Walnut, CA
- – OCRV Center
- – Motorhome Custom Paint Walnut, CA
- – Rv Paint Repair Walnut, CA
- – Rv Paint Walnut, CA
- – Painting Rv Walnut, CA
- – Rv Painting Walnut, CA
- – Custom Painted Motorhomes Walnut, CA
- – Motorhome Paint Repair Walnut, CA
- – Rv Paint Job Walnut, CA
- – Painting Rv Exterior Walnut, CA
- – Painting Fiberglass Motorhome Walnut, CA
- – Motorhome Paint Shops Walnut, CA
- – Custom Rv Paint Walnut, CA
- – Paint Fiberglass Rv Walnut, CA
- – Painting An Rv Walnut, CA
- – OCRV Center
Latest Posts
Rv Rubber Roof Replacement Rowland Heights
Rv Carpet Installation Orange
Rv Refrigeration Repair Montclair
More
Latest Posts
Rv Rubber Roof Replacement Rowland Heights
Rv Carpet Installation Orange
Rv Refrigeration Repair Montclair