All Categories
Featured
Table of Contents
- – Horse Trailer Repair Near Me Riverside, CA
- – OCRV Center
- – Rv Trailer Service Near Me Riverside, CA
- – Fifth Wheel Repair Near Me Riverside, CA
- – Travel Trailer Repairs Riverside, CA
- – Trailer Awning Replacement Riverside, CA
- – Fifth Wheel Repair Near Me Riverside, CA
- – Fifth Wheel Service Riverside, CA
- – 5th Wheel Repair Near Me Riverside, CA
- – Rv Travel Trailer Repair Near Me Riverside, CA
- – Travel Trailer Replacement Windows Riverside...
- – Travel Trailer Siding Repair Riverside, CA
- – Travel Trailer Service Riverside, CA
- – Travel Trailer Window Replacement Riverside, CA
- – OCRV Center
Horse Trailer Repair Near Me Riverside, CA
RVs provide enjoyable, exhilaration, and a lot of adventurous opportunities. For all that they have to give, they call for normal focus in the form of maintenance and upkeep to keep them looking and working at their prime for as long as feasible. One of the most essential things to keep an eye out for with camper trailers and Motor homes is water damages, as these lorries by their very nature are generally revealed to the elements.
If water invasion has triggered the timber framing of your motor home or camper to splash, after that you'll need to allow it to totally dry out before covering it back over with timber floor covering. Enable open-air drying of framing products for at least a week and afterwards use a mold-killing item such as a borax option to eliminate future rot problems in the exact same area.
That stated, it is very vital for mounting products to be completely dried before doing this or else you run the risk of producing a kind of covering that motivates rot in the timber below the seal. Allow three to 4 days for epoxy material to totally heal. Now that you've taken care to totally dry out and secure the framing against future water invasion, you can outline new floor covering.
I invested a few hours searching this forum for info that would certainly assist me in replacing two substantial floor areas in my 2011 MPG 181. Like I've reviewed a lot of of the customers did right here, I bought a travel trailer that had issues that I ought to have been able to diagnose and take into consideration in my purchase.
Rv Trailer Service Near Me Riverside, CA
I haven't started tearing right into the floor yet as I wish to seek and off the leakages first to reduce additional water damage. Not much sense in replacing a flooring that will certainly just obtain damp once more in the following rainfall or journey through a rainstorm. I did get some fantastic details herein corresponding to what might be dripping and exactly how to examine for and repair the leaks.
Anyhow, any help or advice would certainly be substantially valued. I do intend on taking photos and posting them during this task to share with those that might remain in the very same watercraft, or in this case,, robo.
Identify areas showing indicators of water damage, warping, or any type of other concerns. This initial analysis is critical for assisting you in the subsequent repair steps by helping you determine the particular materials and tools required. By thoroughly assessing the condition of the flooring, you can make educated decisions concerning the range of the repair work and guarantee that you are sufficiently prepared.
Fifth Wheel Repair Near Me Riverside, CA
Put in the time to completely examine and analyze the damage prior to beginning on the fixings to achieve much more reliable and reliable results. After assessing the degree of the damage, procure the essential materials and devices. Regular supplies for fixing travel trailer floor covering incorporate plywood, plastic, or laminate floor covering, adhesive, and sealant.
This careful preparation makes certain that the repair service work can be brought out with accuracy and without hindrance from any kind of unneeded items or blockages. Utilize a circular saw or jigsaw to carefully eliminate the jeopardized portions of the flooring. Execute precise cuts to assure a smooth combination with the substitute products.
Travel Trailer Repairs Riverside, CA
Be thorough in making use of the cutting tools to maintain precision throughout the process, making certain that the brand-new materials fit comfortably right into place. This precision is important for the total success of the repair work, boosting the resilience and visual communication of the recovered flooring. Offer special consideration to locations with water damage, as thorough and precise cutting in these areas is critical for avoiding any type of possible concerns down the line.
Adhering to the completion of the fixing, make certain correct air flow for your traveling trailer. Open up doors and windows to assist in the flow of fresh air, quickening the drying process and minimizing the possibility of mold or mildew formation. Permitting adequate airflow is vital to advertising a healthy and balanced atmosphere within the trailer, reducing the risk of moisture retention.
After the mended floor covering has extensively dried and cured, revive your furnishings and design into the travel trailer. Take this moment to restructure and rejuvenate the interior, crafting a welcoming space for your forthcoming experiences. With the fixed floor covering providing a steady foundation, maximize this opportunity to enhance the format and aesthetics of your trailer.
A reliable repair service can make sure that your traveling trailer is equipped to hold up against the diverse climate problems Michigan offers, from cool winters to warm summers. Spending time and initiative right into the repair service procedure is a financial investment in the durability of your traveling trailer, guaranteeing it continues to be a reputable companion on your Michigan journeys.
Trailer Awning Replacement Riverside, CA
Save on your own some time and difficulty and let the pros at RV Roof Repair work Florida replace your RV flooring. Typically, we see Motor homes with 20-year-old carpeting, vinyl, or linoleum.
When carpeting is mounted, it's put on one tack strip and then stretched to the contrary wall surface. When the carpet is pulled up, roll it up, and eliminate it from the train.
Fifth Wheel Repair Near Me Riverside, CA
It's larger than you believe. You might require 2 people to raise it. If you experience discolorations on your carpeting, hold your breath when you're drawing. Sandy dust escapes; in some cases it's dried family pet urine. Currently, if your trainer has a slide out, it's going to be much more tough. Many older Motor homes have leave that go the whole method out whereas more recent ones have quit come out and then make the flooring flush.
If you wish to maintain going at it yourself, after that tear up the tack strips and staples. If you do not get them all, you'll have bumps under your floor covering. You'll be stunned at the variety of staples. Some staples are easy to take out. Get hold of pliers and tug upward or wedge a flat head screw motorist beneath, press down on the handle and it'll elope.
Fifth Wheel Service Riverside, CA
That occurs with peel and stick flooring tiles. You'll find staples in every corner of your train and your hands and fingers will be sore from drawing them all up. After they're full blast, move or vacuum up the particles and double check for staples you missed the initial time.
It's vital to make sure that the flooring is smooth, tidy and there's no glossy paint left behind. Or else the flooring may not stick.
If you're not certain exactly how to shim that, luan makes a fantastic alternative. It's also crucial to secure your bathroom location well. As you know, water makes timber and wood laminate swell and agreement - Riverside Trailer Window Replacement. It's even far better to make sure that when you're prepared to install the new floor covering that you provide it time to relax in the native environment.
5th Wheel Repair Near Me Riverside, CA
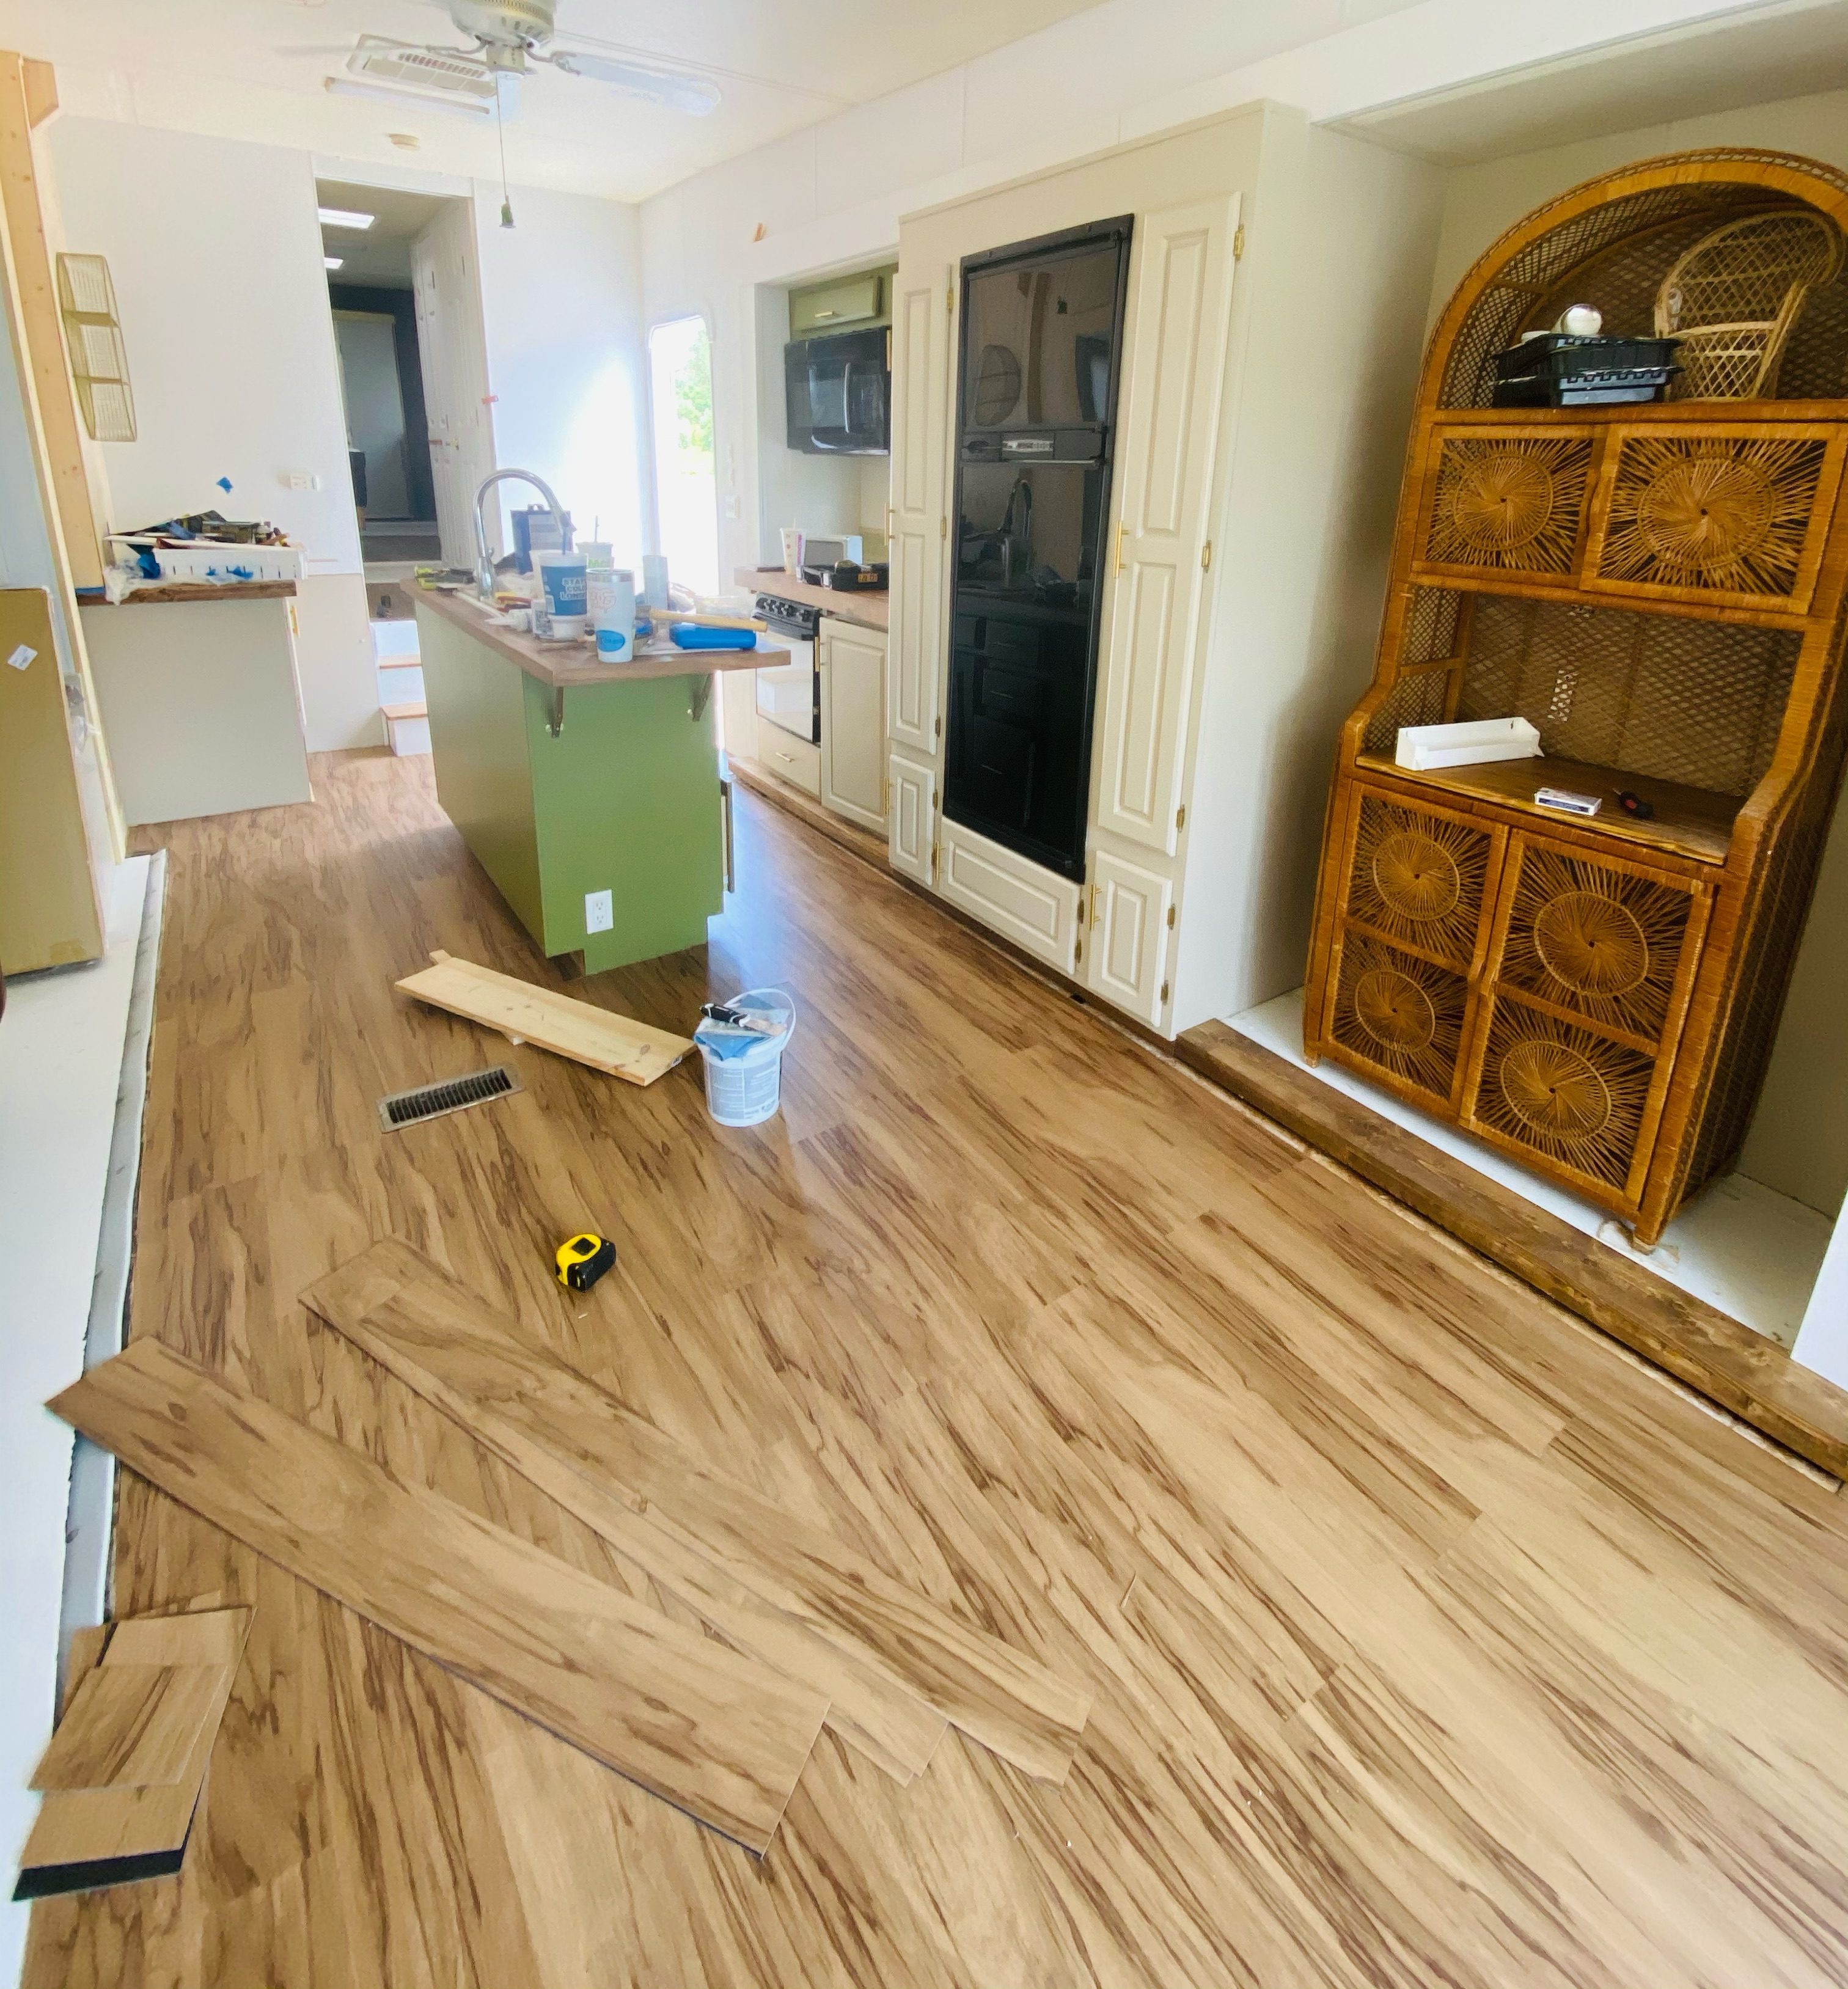
Guide can take a lengthy time to dry. In Florida, it can occupy to 3 hours with all the moisture. Now that you prepare to place in the brand-new flooring, make sure it matches the inside. A great deal of men I see run right into this issue. They take down the brand-new floor covering just to find their partner does not such as the color since it does not match the indoor treatments.
After that, choose where you desire the brand-new floor covering and determine it. Make sure you have the ideal color, pattern, dimension and measurements. From there, choose a line that's square and put down a chalk line so you obtain it good and straight. It's hard due to the fact that lines aren't always square. Now begin laying the drifting floorings one-by-one.
It's ideal to scratch the floor covering and make certain you reduced about door jams prior to you lay it down. It won't break right into location or else. Do a dry fit to examine (Riverside Trailer Window Replacement). If you're installing floating floors, you must understand they might be bolted down on one side and afterwards float over the subfloor.
The flooring is laid, make sure to cut it out so it looks finished. Now that you know all the steps included in laying RV flooring, do you really desire to spend your weekend doing messy, unclean work?
Rv Travel Trailer Repair Near Me Riverside, CA
A friend's camper has actually been dripping for some time obviously and has actually decayed out the flooring, journal and joists. The neighborhood camper sales/service place wanted $200 ...
Determining factors figuring out aspectsConsist of dimension choice, selection(s), and pre-existing damage underneath, below. Please note: this rate does consist of the expense of materials and shop materials.
Travel Trailer Replacement Windows Riverside, CA
Your home furnishings is conveniently raised and relocated to an additional area or outside. RV furniture is bolted in area. After unbolting the furniture, essentially it will be as well huge to fit with the entrance door. That furniture will continue to be within, and our professional will move it from one side of the unit to the various other as they work.
If we were to harm these things, we most likely can not purchase a replacement. RV carpet is NOT set up like a home with a tack strip.
Travel Trailer Siding Repair Riverside, CA
Your new floor choice is a big deciding consider your general labor expense. It is far less time taking in for our specialists to install carpet or linoleum than it is to install a hardwood/laminate flooring that needs a specialist to cut each plan, individually. There is also preparation job you can contribute to that conserves our professionals time.
***DO NOT ATTEMPT ANY PREPARATION FUNCTION BEFORE An APPOINTMENT. IF PREP WORK IS NOT FINISHED CORRECTLY, IT MAY REASON ADDITIONAL LABOR HOURS FOR OUR PROFESSIONALS **Please call (209) 263-7040 and arrange a motor home Flooring Appointment. The consultation costs $200.00. This will certainly be credited to your RV Flooring Replacement job when booked.
A couple of things to take into consideration are the design of your area, the condition of your subfloor, and the level of trouble to install your picked pattern. Armstrong has a acrylic cement that stands up to breaking, spots, and remains adaptable throughout usage and in travel. If you want assurance that your floor covering is set up properly, we advise having an expert flooring installer.
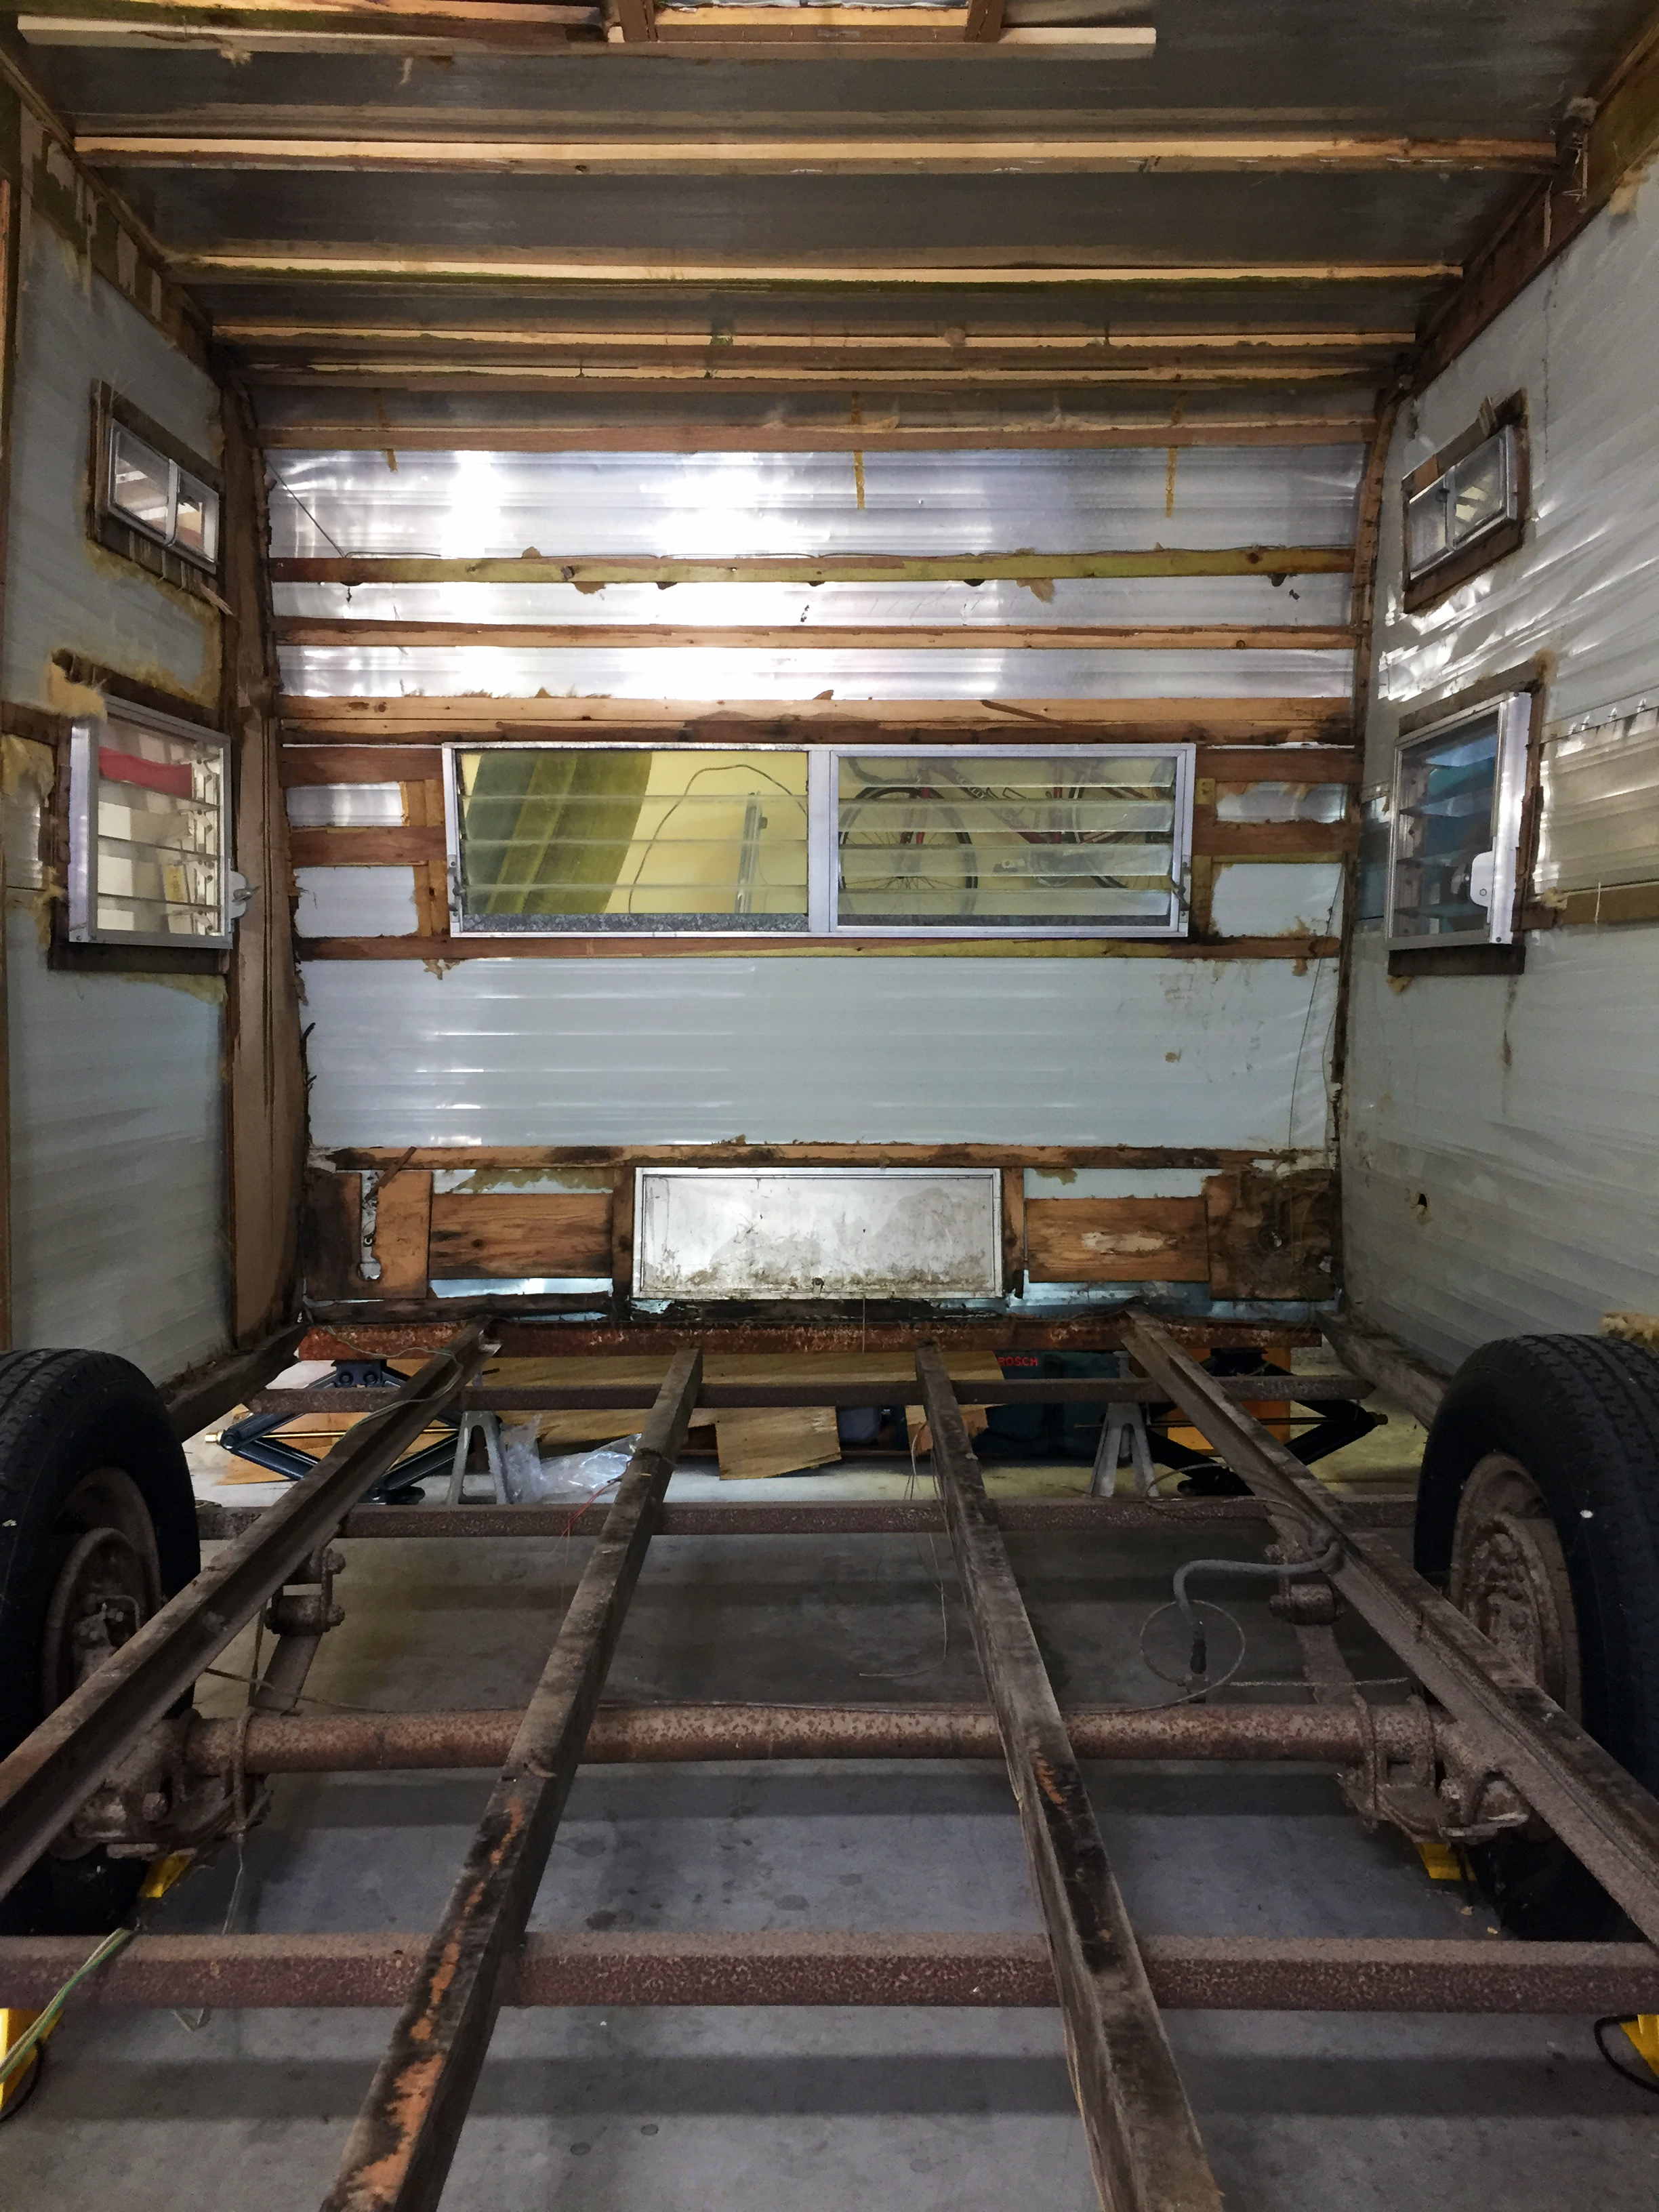
Your motor home, motorhome, camper or trailer has been your relied on friend on plenty of adventures, however it also carries the marks of its trips. These could be in the kind of water damages, rot, or basic deterioration on the recreational vehicle flooring. Assessing the level of this damage is the primary step towards your location of a perfectly remodeled vehicle.
Travel Trailer Service Riverside, CA
The visibility of mold and mildew or mildew is another indication of water damage. Bear in mind, catching these problems early is like detecting a minor issue during a regular automobile assessment. It permits you to resolve the trouble prior to it escalates into a significant repair. Put in the time to evaluate your present arrangement to, for example, recognize if you require to change rotted timber floor covering.
Maintain in mind that you shouldn't use underlayment with any of these alternatives as you can simply utilize a drifting flooring or stick directly to the plywood. Laminate floor covering is like the all-terrain vehicle of the flooring worldit's versatile, cost-efficient, and simple to install. It's a popular selection amongst motor home owners many thanks to its light-weight nature and the reality that it simulates the look of wood flooring.
As a result, if you're considering this choice, you'll require to safeguard it from water damages, particularly if you have family pets or youngsters. If you're searching for a floor covering choice that's sturdy, water-resistant, and very easy to clean, plastic plank floor covering may be your finest bet. This is a versatile, versatile option given that it withstands the aspects and is built to last.
Travel Trailer Window Replacement Riverside, CA
With your devices, materials and strategy in position, it's time to roll up your sleeves and study the meat of this job: eliminating the old motor home flooring. This process can differ depending on the kind of floor covering you're taking care of. Vinyl floor covering, carpeting, and wood flooring each require a different approach.
To remove the old carpeting, adhere to these steps: Cut the rug into workable areas making use of an utility knife. If your brand-new flooring mount demands underlayment, you can recycle this. Use pliers or a carpeting puller to bring up the carpet areas (be individual, as this procedure can be taxing due to the variety of staples used to protect the carpeting) When all the carpeting is removed, use a staple lifter or oscillating multi-tool to get rid of any remaining staples Getting rid of wood flooring is a bit extra intricate, yet it's absolutely nothing a brave DIYer can not take care of.
What does it indicate to evaluate the sub-floor? Search for any indications of damage that could influence the floor's integrity, such as rot, mold, or water damages. If you find any signs of water damage, such as staining, bending, or mold and mildew, you'll require to resolve these problems prior to continuing with the floor covering installment.
If your sub-floor has considerable damage, repairing Often, the damages to the sub-floor is so substantial that fixing simply the damaged sections isn't enough. In these instances, you'll need to replace the whole sub-floor. If this holds true, it can be a much bigger burden and time dedication. While it may be feasible to fix on your own, we advise seeing your neighborhood RV repair work store to determine following actions to make certain the stability of your floor.
Camper Floor Repair Near Me Riverside, CATravel Trailer Service Riverside, CA
Rv Trailer Repair Near Me Riverside, CA
Travel Trailer Floor Repair Riverside, CA
Horse Trailer Repair Near Me Riverside, CA
Rv Trailer Repair Near Me Riverside, CA
Rv Trailer Repair Shop Riverside, CA
Horse Trailer Repairs Riverside, CA
Travel Trailer Siding Repair Riverside, CA
Trailer Window Replacement Riverside, CA
Cargo Trailer Repair Riverside, CA
Travel Trailer Ceiling Repair Riverside, CA
Travel Trailer Window Replacement Riverside, CA
Travel Trailer Awning Replacement Riverside, CA
Camper Floor Repair Near Me Riverside, CA
Travel Trailer Roof Replacement Riverside, CA
Camper Trailer Service Riverside, CA
Trailer Awning Replacement Riverside, CA
Trailer Restoration Riverside, CA
Travel Trailer Replacement Windows Riverside, CA
Horse Trailer Repairs Riverside, CA
Fifth Wheel Repair Near Me Riverside, CA
Travel Trailer Ceiling Repair Riverside, CA
Camper Trailer Service Riverside, CA
Travel Trailer Furniture Riverside, CA
Rv Trailer Service Near Me Riverside, CA
Trailer Restoration Riverside, CA
Trailer Window Replacement Riverside, CA
Trailer Windows Replacement Riverside, CA
Travel Trailer Window Replacement Riverside, CA
Travel Trailer Furniture Riverside, CA
5th Wheel Repair Near Me Riverside, CA
Travel Trailer Roof Replacement Riverside, CA
Travel Trailer Ceiling Repair Riverside, CA
Camping Trailer Repair Near Me Riverside, CA
Rv Trailer Service Near Me Riverside, CA
Travel Trailer Furniture Riverside, CA
Trailer Roof Repair Riverside, CA
Travel Trailer Siding Repair Riverside, CA
Travel Trailer Siding Repair Riverside, CA
Travel Trailer Window Replacement Riverside, CA
Horse Trailer Repairs Riverside, CA
Travel Trailer Floor Repair Riverside, CA
Fifth Wheel Service Riverside, CA
Travel Trailer Ceiling Repair Riverside, CA
Cargo Trailer Repair Riverside, CA
Trailer Windows Replacement Riverside, CA
5th Wheel Repair Near Me Riverside, CA
Trailer Awning Replacement Riverside, CA
Fifth Wheel Service Riverside, CA
Travel Trailer Replacement Windows Riverside, CA
Trailer Restoration Riverside, CA
Trailer Roof Repair Riverside, CA
Travel Trailer Ceiling Repair Riverside, CA
Fifth Wheel Repair Near Me Riverside, CA
Rv Trailer Repair Near Me Riverside, CA
Travel Trailer Ceiling Repair Riverside, CA
Trailer Window Replacement Riverside, CA
Rv Trailer Repair Shop Riverside, CA
Travel Trailer Window Replacement Riverside, CA
Trailer Restoration Riverside, CA
Travel Trailer Furniture Riverside, CA
Travel Trailer Service Riverside, CA
Camper Trailer Service Riverside, CA
Fifth Wheel Repair Near Me Riverside, CA
Camping Trailer Repair Near Me Riverside, CA
5th Wheel Repair Near Me Riverside, CA
Fifth Wheel Repair Near Me Riverside, CA
Rv Travel Trailer Repair Near Me Riverside, CA
Trailer Windows Replacement Riverside, CA
Trailer Windows Replacement Riverside, CA
Travel Trailer Furniture Riverside, CA
Travel Trailer Repairs Riverside, CA
Fifth Wheel Repair Near Me Riverside, CA
Trailer Windows Replacement Riverside, CA
Fifth Wheel Repair Near Me Riverside, CA
Rv Travel Trailer Repair Near Me Riverside, CA
Horse Trailer Repairs Riverside, CA
Near Here Seo Marketing Riverside, CA
Near My Location Seo Consultant Riverside, CA
OCRV Center
Table of Contents
- – Horse Trailer Repair Near Me Riverside, CA
- – OCRV Center
- – Rv Trailer Service Near Me Riverside, CA
- – Fifth Wheel Repair Near Me Riverside, CA
- – Travel Trailer Repairs Riverside, CA
- – Trailer Awning Replacement Riverside, CA
- – Fifth Wheel Repair Near Me Riverside, CA
- – Fifth Wheel Service Riverside, CA
- – 5th Wheel Repair Near Me Riverside, CA
- – Rv Travel Trailer Repair Near Me Riverside, CA
- – Travel Trailer Replacement Windows Riverside...
- – Travel Trailer Siding Repair Riverside, CA
- – Travel Trailer Service Riverside, CA
- – Travel Trailer Window Replacement Riverside, CA
- – OCRV Center
Latest Posts
Rv Delamination Repair Near Me Montclair
Hood Vent Cleaning Services San Marino
Central Air Conditioner Prices Sherman Oaks
More
Latest Posts
Rv Delamination Repair Near Me Montclair
Hood Vent Cleaning Services San Marino
Central Air Conditioner Prices Sherman Oaks